Tongue And Groove On Ceiling: A Comprehensive Guide
Tongue and groove (T&G) is a method of fitting similar objects together, edge to edge, used chiefly with wood, in flooring, paneling, and similar applications. The term "tongue and groove" is also used in other contexts to describe similar joinery. The edges of each board are manufactured with a protruding "tongue" on one side and a corresponding "groove" on the other. The tongue of one board fits into the groove of the next, creating a tight, interlocking connection. Applying tongue and groove to a ceiling offers a visually appealing surface that can enhance the aesthetics of a room, while simultaneously providing structural benefits and design flexibility.
This article explores the application of tongue and groove to ceilings, detailing its advantages, disadvantages, installation techniques, material choices, stylistic considerations, and maintenance requirements. It aims to provide a comprehensive understanding of using T&G for ceiling applications, enabling informed decisions for homeowners and construction professionals.
Advantages of Using Tongue and Groove on Ceilings
There are several advantages to using tongue and groove for ceiling applications, beyond purely aesthetic appeal. These advantages influence both the structural integrity and the overall atmosphere of the space.
Aesthetic Appeal: Tongue and groove ceilings offer a classic and timeless look. The interlocking design creates a seamless appearance with clean lines, visually expanding the space and adding architectural interest. Different wood species, finishes, and stain colors can be used to achieve a variety of styles, from rustic to modern. This versatility allows for customization to match the overall design scheme of the room.
Enhanced Durability: When properly installed and maintained, tongue and groove ceilings can provide decades of dependable service. The interlocking design creates a solid surface that is less prone to warping or sagging than other ceiling materials. Using high-quality wood and appropriate fasteners can further enhance the durability of the ceiling.
Concealment of Imperfections: Existing ceilings may have imperfections, such as cracks, uneven surfaces, or unsightly wiring. Installing tongue and groove directly over the existing ceiling covers these flaws, providing a clean and uniform surface. It eliminates the need for extensive repairs or skim coating, saving time and money.
Improved Insulation and Acoustics: Tongue and groove ceilings can contribute to improved insulation and acoustics. The wood acts as a natural insulator, helping to regulate temperature and reduce energy costs. Additionally, the wood surface absorbs sound, reducing echoes and reverberation within the room. Installing insulation between the T&G and the existing ceiling further enhances these benefits.
Easy Installation: While proper planning and execution are essential, the tongue and groove installation process can be relatively straightforward, particularly for those with carpentry experience. The interlocking design simplifies alignment and fastening, making the installation process more efficient. Specialized tools, such as a nail gun and a table saw, can further expedite the process.
Versatility in Design: Tongue and groove ceilings can be installed in various configurations, including horizontal, vertical, and diagonal. This versatility allows for creative design options and can be used to emphasize specific architectural features. The boards can also be painted or stained to achieve a wide range of colors and finishes.
Disadvantages of Using Tongue and Groove on Ceilings
Despite its numerous benefits, tongue and groove ceilings also present certain disadvantages that warrant consideration before installation. These drawbacks often relate to cost, maintenance, and potential installation challenges.
Cost: Tongue and groove material, especially if using high-quality hardwoods, can be more expensive than other ceiling options like drywall or drop ceilings. The cost also encompasses labor and additional materials such as fasteners, adhesives, and finishes. This initial investment can be a significant factor for budget-conscious projects.
Potential for Moisture Damage: Wood is susceptible to moisture damage, which can result in warping, rot, or mold growth. Tongue and groove ceilings in bathrooms, kitchens, or other areas with high humidity require proper ventilation and moisture-resistant finishes. Without these precautions, the ceiling can deteriorate over time.
Installation Requires Skill: While the interlocking design simplifies alignment, installing tongue and groove ceilings still requires carpentry skills and precision. Accurate measurements, proper cutting techniques, and secure fastening are essential for a professional and durable result. Hiring a qualified contractor is often recommended to ensure a successful installation.
Maintenance Requirements: Tongue and groove ceilings require regular maintenance to preserve their appearance and integrity. Dusting and cleaning are necessary to prevent dirt and grime buildup. Periodic refinishing or resealing may also be required to protect the wood from moisture and wear.
Limited Accessibility to Wiring and Plumbing: Once installed, accessing wiring or plumbing located above a tongue and groove ceiling can be challenging. Unlike drop ceilings, which offer easy access to the space above, T&G requires removal of the boards, which can be time-consuming and potentially damaging. Careful planning and consideration of future maintenance needs are essential.
Expansion and Contraction: Wood naturally expands and contracts with changes in temperature and humidity. This movement can cause gaps to appear between the boards, especially in areas with significant climate fluctuations. Proper acclimatization of the wood before installation and the use of expansion joints can help minimize these issues.
Installation Techniques for Tongue and Groove Ceilings
The installation of tongue and groove ceilings involves several steps, each requiring attention to detail to ensure a professional and durable result. Understanding these techniques is crucial for both DIY enthusiasts and professional contractors.
Preparation: Before starting the installation, the existing ceiling should be inspected for any structural issues or imperfections. Any necessary repairs or reinforcements should be completed. The surface should be clean, dry, and free of debris. It is recommended to acclimatize the tongue and groove boards to the room's temperature and humidity for several days before installation to minimize expansion and contraction issues.
Framing and Furring Strips: Installing furring strips perpendicular to the direction of the T&G boards is essential for providing a secure and level surface for fastening. The furring strips should be spaced evenly, typically 16 to 24 inches apart, depending on the thickness of the T&G boards and the span between supports. Use a level to ensure that the furring strips are perfectly aligned.
Cutting and Fitting: Measure and cut the tongue and groove boards to the appropriate length, allowing for a slight gap at the ends for expansion. Use a miter saw or table saw for precise cuts. Start the installation along one wall, ensuring that the first board is perfectly aligned and secured to the furring strips. Use a nail gun or screws to fasten the boards, driving the fasteners through the tongue at an angle for concealment.
Interlocking the Boards: Align the tongue of each subsequent board with the groove of the previous board. Gently tap the boards together using a rubber mallet and a tapping block to ensure a tight and secure fit. Avoid using excessive force, which can damage the tongue or groove. Continue this process until the entire ceiling is covered.
Finishing and Trimming: Once the tongue and groove boards are installed, fill any nail holes or imperfections with wood filler. Sand the surface smooth and apply the desired finish, such as stain, paint, or sealant. Install trim around the perimeter of the ceiling to cover any gaps and provide a finished look. Consider using crown molding or other decorative trim to enhance the aesthetic appeal.
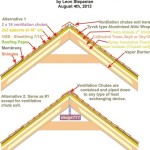
Ventilation and Moisture Control: In areas with high humidity, such as bathrooms or kitchens, ensure adequate ventilation to prevent moisture buildup. Install exhaust fans or open windows to promote airflow. Use moisture-resistant finishes and sealants to protect the wood from water damage. Consider installing a vapor barrier between the existing ceiling and the T&G boards to further protect against moisture penetration.
By carefully following these installation techniques, a durable and aesthetically pleasing tongue and groove ceiling can be achieved. Professional installation is recommended for those lacking carpentry experience or for complex projects.

Diy Tongue And Groove Ceiling Wood Planks Jenna Sue Design

Build A Tongue And Groove Porch Ceiling Cardinal Home Center Central Virginia Building Supply

Diy Tongue And Groove Ceiling Wood Planks Jenna Sue Design

How To Install A Tongue And Groove Ceiling In Kitchen Chatfield Court

Why Choose Pine Tongue And Groove Ceiling Planks Prestige

Diy Tongue And Groove Ceiling Wood Planks Jenna Sue Design

How To Install A Tongue And Groove Ceiling The Unprofessional

Diy Tongue And Groove Ceiling Wood Planks Jenna Sue Design

Diy Tongue And Groove Ceiling Wood Planks Jenna Sue Design

Tongue And Groove Ceiling Planks Ceilings Armstrong Residential
Related Posts