Hunter Ceiling Fans Replacement Glass: A Comprehensive Guide
Hunter ceiling fans are renowned for their quality, durability, and aesthetic appeal. A key component contributing to their visual appeal is the glass shade that diffuses light and complements the overall design. However, accidents happen, and glass shades can break or become damaged over time. When this occurs, finding a suitable replacement is essential to restore both the functionality and appearance of the ceiling fan. This article provides a comprehensive guide to understanding Hunter ceiling fan replacement glass, covering various aspects from identifying the correct type to installation.
Identifying the Correct Replacement Glass
The first and arguably most important step in replacing the glass shade on a Hunter ceiling fan is identifying the correct replacement. Purchasing the wrong glass can lead to compatibility issues, altered aesthetics, and potential safety hazards. Several factors contribute to identifying the correct replacement glass:
Model Number: The model number of the ceiling fan is the most reliable identifier. This number is typically located on a sticker on the fan motor housing. Once the model number is obtained, it can be used to search for compatible replacement glass shades on the Hunter website or through authorized retailers. This method ensures the replacement glass is specifically designed for the fan and will fit properly.
Glass Dimensions: If the model number is unavailable or obscured, measuring the original glass shade becomes crucial. Precise measurements of the diameter (both at the top and bottom of the shade, if applicable), height, and mounting hole diameter (if the glass is secured with screws) are essential. These measurements will help narrow down the search for a compatible replacement. It's vital to be as accurate as possible, as even slight discrepancies can prevent a proper fit.
Glass Shape and Style: Hunter ceiling fans utilize a wide range of glass shapes and styles, including bowl-shaped, bell-shaped, cylindrical, and dome-shaped. The style of the glass should match the original as closely as possible to maintain the ceiling fan's aesthetic consistency. Consider the texture, color, and any decorative elements present on the original glass shade. Photographs of the original glass can be helpful when comparing it to potential replacements online or in stores.
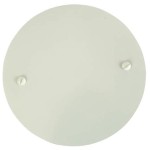
Mounting Mechanism: The method by which the glass shade attaches to the fan's light fixture is another critical consideration. Common mounting mechanisms include screws, a fitter ring (a metal collar that holds the glass), and pressure clips. The replacement glass must be compatible with the existing mounting mechanism. For example, if the original glass has screw holes, the replacement must also have corresponding holes and be sized correctly to align with the fixture's mounting points.
Light Bulb Compatibility: While not directly related to the glass shade itself, it's important to consider the type of light bulbs the fan utilizes. Ensure the replacement glass is suitable for the wattage and type of bulbs used. Some glass shades are designed to diffuse heat more effectively than others, and using the wrong glass could potentially lead to overheating issues. Check the fan's documentation or the original glass packaging for any specific recommendations regarding bulb types and wattage limitations.
Sourcing Replacement Glass
Once the correct replacement glass has been identified, the next step is to source the component. Several options are available, each offering varying degrees of convenience and cost-effectiveness.
Hunter Website: The official Hunter Fan Company website is a primary source for replacement parts. It allows users to search for parts by model number, ensuring a high degree of compatibility. The website typically offers a wide selection of replacement glass shades, often with detailed product descriptions and images. Purchasing directly from Hunter can provide assurance of quality and authenticity, although prices may be higher compared to other sources.
Authorized Retailers: Many home improvement stores and lighting retailers are authorized sellers of Hunter ceiling fans and replacement parts. These retailers often carry a selection of replacement glass shades in stock and can assist with identifying the correct part based on the fan's model number. Visiting a physical store allows for a hands-on comparison of different glass shades, ensuring the desired style and fit. However, the availability of specific replacement glass shades may vary depending on the retailer's inventory.
Online Marketplaces: Online marketplaces such as Amazon and eBay offer a vast selection of replacement glass shades for Hunter ceiling fans. These platforms often feature products from various vendors, including both authorized retailers and third-party sellers. While online marketplaces can offer competitive prices and a wide range of options, it's crucial to exercise caution when purchasing from unfamiliar sellers. Carefully review product descriptions, read customer reviews, and verify the seller's reputation to ensure the replacement glass is of good quality and compatible with the ceiling fan.
Salvage Yards and Second-Hand Stores: In some cases, it may be possible to find replacement glass shades at salvage yards or second-hand stores. This option can be particularly appealing for older or discontinued Hunter ceiling fan models where replacement parts are no longer readily available. However, finding a suitable match can be challenging, and the condition of the glass may vary. Thoroughly inspect the glass for any cracks, chips, or other damage before purchasing it. Furthermore, ensure the glass is clean and free of any debris.
Consider Generic Replacements: If the exact original glass cannot be located, consider universal or generic replacement options. These usually come in standard sizes and shapes that can fit a range of fans. While it may slightly alter the overall look of the fan, it can be a viable option to restore functionality.
Installation Procedures and Safety Considerations
Installing the replacement glass shade on a Hunter ceiling fan is a relatively straightforward process, but it's essential to follow safety precautions to prevent accidents and ensure proper installation.
Power Disconnection: The most critical safety precaution is to disconnect the power to the ceiling fan before starting any work. Turn off the circuit breaker that controls the fan to prevent electrical shock. This step is crucial to avoid any potential electrical hazards during the installation process. Verify that the power is off by testing the light fixture with a non-contact voltage tester.
Removal of Existing Glass: Carefully remove any remaining pieces of the broken or damaged glass shade. Wear gloves to protect hands from sharp edges. If the glass is held in place by screws, loosen them carefully and remove the glass. If the glass is held by a fitter ring, unscrew the ring and carefully detach the glass. If it's using pressure clips, gently flex the clips to release the glass shade.
Cleaning the Fixture: Before installing the replacement glass, clean the light fixture and surrounding area. Remove any dust, dirt, or debris that may have accumulated. This helps ensure a clean and secure fit for the new glass shade. Use a soft cloth and mild cleaning solution to clean the fixture, being careful not to damage any electrical components.
Installing the Replacement Glass: Position the replacement glass shade onto the light fixture, aligning the mounting holes (if applicable) with the corresponding holes on the fixture. If screws are used, tighten them gently to secure the glass in place. Avoid over-tightening the screws, as this could crack or damage the glass. If a fitter ring is used, screw the ring onto the fixture until the glass is securely held. If pressure clips are used, gently flex the clips to secure the glass shade.
Verification: After installation, visually inspect the replacement glass to ensure it is properly seated and secured. Check for any gaps or unevenness. Gently shake the fan to confirm that the glass is firmly attached and does not wobble. Turn the power back on at the circuit breaker and test the light fixture to ensure it is functioning correctly. Verify the bulbs are properly positioned and illuminated.
Troubleshooting: If the light does not turn on, double-check the light bulb and ensure it is properly installed. If the problem persists, check the wiring connections inside the fan's light fixture. Consult a qualified electrician if unsure about any electrical connections. If the replacement glass is not fitting properly, review the measurements and compatibility with the fan’s model. Consider returning the replacement and selecting a more appropriate option.
By following these steps, replacing the glass shade on a Hunter ceiling fan can be a safe and straightforward task, restoring both the functionality and aesthetic appeal of the fixture.

Builder Deluxe With Light 52 Inch Ceiling Fan Hunter

Discontinued Hunter Ceiling Fan Needs New Glass

Hunter Ceiling Fan Replacement 3 Globes Shades Clear Lined Beaded Ebay

Hunter 6 In X 11 Bowl Frosted Amber Stained Glass Ceiling Fan Light Shade With 2 1 4 Reflector Fitter The Shades Department At Lowes Com

Hunter 6 In X 14 Bowl White Linen Clear Glass Ceiling Fan Light Shade With 2 1 4 Set Crew Fitter The Shades Department At Lowes Com

Replacement Glass Shades For Hunter Fans Fan

Hunter Ceiling Fan Replacement Globes Shades 4 Lined Beaded Clear Ebay

Hunter Newsome 52 In Indoor Premier Broe Bowl Light Kit Ceiling Fan 53311 The Home

Intercept Fluro Replacement Glass Deep Hunter Pacific

Hunter Ceiling Fan Replacement Parts Fans Lighting Patio Furniture Outlet Light Kit Diy Network Kits