Hunter Ceiling Fan Glass Replacement
Hunter ceiling fans are known for their quality and durability, but even the best fans can experience wear and tear over time. One of the most common problems is broken or cracked glass. If the glass on your Hunter ceiling fan breaks, it's important to replace it as soon as possible to prevent further damage. Replacing the glass on a Hunter ceiling fan is a relatively simple process that can be completed in a few minutes.
Tools and Materials You'll NeedBefore you begin, you'll need to gather the following tools and materials:
- Replacement glass
- Screwdriver
- Putty knife or credit card
Once you have your tools and materials, follow these steps to replace the glass on your Hunter ceiling fan:
1. Turn Off the PowerBefore you do anything else, turn off the power to the ceiling fan at the circuit breaker or fuse box. This will prevent you from getting an electrical shock while you're working.
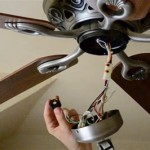
2. Remove the Existing GlassUse a screwdriver to remove the screws that hold the glass in place. Once the screws are removed, carefully remove the glass from the fan. Be careful not to drop the glass or cut yourself on the edges.
3. Clean the FrameOnce the glass is removed, use a putty knife or credit card to clean the frame of the fan. Remove any dirt, dust, or debris that may have accumulated over time. This will help to ensure that the new glass fits properly.
4. Install the New GlassPlace the new glass in the frame of the fan. Make sure that the glass is aligned properly and that it fits snugly. Once the glass is in place, tighten the screws to secure it.
5. Turn On the PowerOnce the new glass is installed, turn on the power to the ceiling fan at the circuit breaker or fuse box. The fan should now be working properly with the new glass in place.
TipsHere are a few tips to help you replace the glass on your Hunter ceiling fan:
- If you're not comfortable replacing the glass yourself, you can contact a professional electrician for help.
- Be sure to purchase the correct replacement glass for your Hunter ceiling fan model.
- When removing the old glass, be careful not to drop it or cut yourself on the edges.
- Clean the frame of the fan thoroughly before installing the new glass.
- Tighten the screws that hold the glass in place securely.
Replacing the glass on a Hunter ceiling fan is a relatively simple process that can be completed in a few minutes. By following these steps, you can safely and easily replace the glass on your Hunter ceiling fan and restore it to its original condition.

Hunter 6 In X 11 Bowl Frosted Amber Stained Glass Ceiling Fan Light Shade With 2 1 4 Reflector Fitter The Shades Department At Lowes Com

Hunter 6 In X 14 Bowl White Linen Clear Glass Ceiling Fan Light Shade With 2 1 4 Set Crew Fitter The Shades Department At Lowes Com

Hunter Ceiling Fan Replacement 3 Globes Shades Clear Lined Beaded Ebay

Low Profile Bowl Light Fixture 99258 Hunter Fan

Hunter Ceiling Fan Replacement Globes Shades 4 Lined Beaded Clear Ebay

Replacement Glass Shades For Hunter Fans Fan

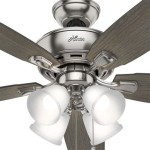
Hunter Creekside 52 In Noble Broe Led Indoor Downrod Or Flush Mount Ceiling Fan With Light 5 Blade The Fans Department At Lowes Com

Discontinued Hunter Ceiling Fan Needs New Glass

Intercept Fluro Replacement Glass Deep Hunter Pacific

Hunter Erikson 52 In Indoor Burnished Brass Ceiling Fan With Remote And Light Kit 51728 The Home
Related Posts