How to Attach Drywall to a Ceiling: A Comprehensive Guide
Attaching drywall to a ceiling is a common home improvement project that can significantly enhance the aesthetic appeal and functionality of a room. While it might seem daunting, understanding the process and utilizing the right tools and techniques can make it a manageable task for experienced DIY enthusiasts or even ambitious beginners. This article provides a detailed, step-by-step guide to successfully installing drywall on a ceiling, covering essential preparation, installation procedures, and finishing touches.
Preparation: Ensuring a Solid Foundation for Success
Before even considering lifting a drywall sheet, meticulous preparation is paramount. This stage sets the stage for a smooth and professional-looking installation. Ignoring preparatory steps can lead to uneven surfaces, weak attachment, and ultimately, a disappointing result.
First and foremost, assess the existing ceiling structure. Are the joists structurally sound and adequately spaced? Standard spacing is typically 16 or 24 inches on center. If the existing joists are damaged or unevenly spaced, reinforcing or correcting them is essential before proceeding. Repairing or sistering joists ensures a strong and level surface to which the drywall can be securely attached. Also, consider the weight of the drywall; ceilings are susceptible to sagging if the joists are inadequate. Consult with a structural engineer or experienced contractor if you have any concerns about the load-bearing capacity of your ceiling.
Next, remove any existing ceiling materials, such as old drywall, plaster, or popcorn texture. This provides a clean and unobstructed surface for the new drywall. Use appropriate tools, such as a scraper, pry bar, or utility knife, to remove the old material carefully. Wear safety glasses and a dust mask to protect yourself from debris and airborne particles. After removal, inspect the exposed joists for any protruding nails or screws and remove them to create a perfectly flat surface.
Accurate measurements are crucial. Measure the dimensions of the ceiling and plan the layout of the drywall sheets. Minimize the number of seams by using the largest practical sheet sizes. Drywall typically comes in 4-foot widths and various lengths (8, 10, or 12 feet). Create a detailed cutting plan that minimizes waste and ensures that seams fall on joists. Use a straight edge and a sharp utility knife to score and snap the drywall to the required dimensions. Remember to score both sides of the drywall along the cut line for a clean, even break.
Gather all necessary tools and materials. This includes: drywall sheets, drywall screws, a drywall screw gun, a drywall lift (highly recommended), a measuring tape, a utility knife, a T-square or straight edge, a pencil, safety glasses, a dust mask, a stud finder, a level, and joint compound materials (tape, knives, etc., which will be described in the finishing section). Ensuring all tools are readily available streamlines the installation process and minimizes interruptions.
Finally, account for any wiring or plumbing that might be present in the ceiling cavity. Locate and map the positions of electrical boxes, plumbing pipes, and any other obstructions that could interfere with the drywall installation. Extend the wires from electrical boxes to be flush with the surface of the new drywall. This ensures easy access for connecting light fixtures or other electrical devices. Cutting out holes for these obstructions before lifting the drywall is much easier and safer than trying to do it while the sheet is suspended.
Installation: Securing Drywall Sheets to the Ceiling Frame
With the preparation complete, the actual installation begins. This stage requires careful coordination and precise execution to achieve a smooth and durable ceiling surface.
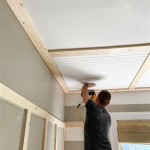
The most crucial aspect of ceiling drywall installation is lifting the sheets. Due to the weight and size of drywall, a drywall lift is strongly recommended. A drywall lift is a mechanical device that allows for controlled and safe lifting of the sheets into position. If a lift is unavailable, enlisting the help of at least two additional people is essential to safely maneuver and hold the drywall in place. Attempting to lift and install drywall sheets alone is dangerous and can result in injury or damage to the drywall.
Position the first drywall sheet against the joists, ensuring that it is flush with the edges of the ceiling and that the seams align with joists. If using a lift, carefully crank the sheet into position until it is snug against the ceiling. If manually lifting the sheet, coordinate with your helpers to hold it securely in place while you begin fastening it.
Secure the drywall to the joists using drywall screws. Use a drywall screw gun to drive the screws into the drywall, ensuring that the screw heads are slightly recessed into the drywall surface without tearing the paper. Place screws approximately 12 inches apart along the perimeter of the sheet and 16 inches apart in the field (the central area of the sheet). Ensure that each screw penetrates the joist sufficiently to provide a secure hold.
Continue installing the remaining drywall sheets, maintaining a consistent pattern and ensuring that the seams align with the joists. Stagger the seams to create a more robust and less visible joint. Avoid creating long, continuous seams that run the entire length or width of the ceiling. When installing the final sheet, it will likely require cutting to fit the remaining space. Measure accurately and cut the sheet to size before lifting it into position.
Around electrical boxes, plumbing pipes, or other obstructions, carefully cut out the necessary holes in the drywall before fastening it. Use a drywall knife or a specialized hole saw to create precise openings that are slightly larger than the obstruction. This allows for some wiggle room and prevents the drywall from binding against the obstruction.
After all the drywall sheets are installed, inspect the surface for any loose screws, protruding nails, or uneven seams. Tighten any loose screws and hammer in any protruding nails. Use a sanding block to smooth any rough edges or minor imperfections. This prepares the surface for the finishing process.
Finishing: Achieving a Seamless and Professional Look
The finishing stage is where the seams and screw holes are concealed, creating a smooth and seamless ceiling surface that is ready for painting or texturing. This step requires patience and attention to detail to achieve a professional-looking result.
Apply drywall tape to all seams between the drywall sheets. Use self-adhesive fiberglass tape, which is easier to apply, or paper tape, which is stronger but requires embedding in joint compound. For paper tape, apply a thin layer of joint compound over the seam, press the tape firmly into the compound, and then wipe away any excess compound. For fiberglass tape, simply apply the tape to the seam.
Apply the first coat of joint compound over the taped seams and screw holes. Use a wide drywall knife (6 or 8 inches) to spread the compound smoothly and evenly over the surface. Feather the edges of the compound to blend seamlessly with the surrounding drywall. Allow the first coat of compound to dry completely, typically for 24 hours.
After the first coat has dried, sand the surface lightly with a sanding sponge or sandpaper to remove any imperfections or ridges. Be careful not to sand too aggressively, as this can damage the paper surface of the drywall. Wear a dust mask to protect yourself from airborne dust particles. Vacuum or wipe down the surface to remove any sanding dust.
Apply a second coat of joint compound over the seams and screw holes, using a wider drywall knife (10 or 12 inches) to create a broader, smoother finish. Feather the edges of the compound even further to blend seamlessly with the surrounding drywall. Allow the second coat of compound to dry completely.
Repeat the sanding process after the second coat has dried. Again, sand lightly and carefully to avoid damaging the drywall paper. Vacuum or wipe down the surface to remove any sanding dust.
Apply a third and final coat of joint compound if necessary, focusing on any remaining imperfections or uneven areas. This coat should be applied with a very wide drywall knife (12 inches or larger) to create a virtually seamless finish. Sand and clean the surface after the final coat has dried.
Once the finishing process is complete, prime the entire ceiling surface with a drywall primer. This seals the surface, provides a uniform base for the paint, and helps the paint adhere properly. Apply two coats of paint or texture of your choice to achieve the desired final look. Consult with a paint specialist to determine the best type of paint or texture for your ceiling.

Hanging Drywall On Ceilings Fine Homebuilding

Hanging Drywall On Ceilings Fine Homebuilding

How To Install Drywall Ceiling Howtospecialist Build Step By Diy Plans

How To Hang Drywall All By Yourself Young House Love

How To Hang Drywall A 7 Step Overview Homeserve Usa

How To Install Ceiling Drywall 12 Steps With S Installation

Drop Ceiling Or Drywall Which One Should You Choose

How To Hang Drywall Like A Pro Diy Family Handyman

How To Hang Drywall In Your Garage

Ceiling Drywall Install With Lift By Laurier Desormeaux Youtube
Related Posts