Hamilton Bay Ceiling Fan With Remote: A Comprehensive Overview
The Hamilton Bay ceiling fan with remote represents a popular choice for homeowners seeking a blend of functionality, style, and convenience. These fans are designed to provide efficient air circulation, enhance room aesthetics, and offer user-friendly control options. This article provides a comprehensive overview of Hamilton Bay ceiling fans with remotes, examining key features, benefits, technology, installation considerations, and potential troubleshooting steps.
Key Features and Benefits
Hamilton Bay ceiling fans with remotes are characterized by a variety of features designed to improve comfort and convenience. One of the primary benefits is enhanced air circulation. These fans are engineered to move air effectively throughout a room, helping to maintain a consistent temperature. This is particularly beneficial in both summer and winter months. In summer, the downward airflow creates a cooling breeze, reducing the need for air conditioning. In winter, reversing the blade direction helps to distribute warm air trapped near the ceiling, improving heating efficiency.
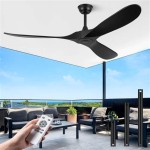
The inclusion of a remote control provides a significant advantage. Users can adjust fan speed, light settings, and even reverse the fan direction without needing to reach a pull chain or wall switch. This is especially useful in rooms with high ceilings or for individuals with mobility limitations. Remotes often include features like dimming capabilities for the light fixture and multiple fan speed settings, allowing for customized comfort levels. The design and aesthetics of Hamilton Bay ceiling fans are diverse, ranging from traditional to contemporary styles. This allows homeowners to select a fan that complements their existing décor. They are available in various finishes, blade materials, and lighting options, ensuring compatibility with different room designs.
Energy efficiency is another essential aspect. Many Hamilton Bay ceiling fans are equipped with energy-efficient motors, often utilizing DC (Direct Current) technology. DC motors consume significantly less energy compared to traditional AC (Alternating Current) motors, resulting in lower electricity bills and a reduced environmental impact. The use of LED lighting further contributes to energy savings, as LED bulbs are more efficient and longer-lasting than incandescent or halogen bulbs.
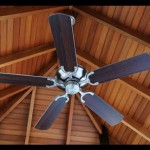
Durability and build quality are also considerations. Hamilton Bay ceiling fans are generally constructed with durable materials, ensuring longevity and reliable performance. The fan blades are typically made from materials like wood, metal, or composite materials, each offering different aesthetic and performance characteristics. The motor housing is designed to protect the motor from dust and debris, contributing to the fan's overall lifespan.
Noise levels are an important factor for many consumers. Hamilton Bay designs its fans to operate quietly, minimizing distractions and creating a more comfortable environment. This is achieved through a combination of motor design, blade balancing, and careful construction techniques. Quiet operation is particularly important in bedrooms and living rooms, where noise can be disruptive.
Remote Control Technology and Functionality
The remote control is an integral part of the Hamilton Bay ceiling fan experience. These remotes typically operate on radio frequency (RF) signals, providing a greater range and reliability compared to infrared (IR) remotes. RF remotes do not require a direct line of sight to the fan receiver, allowing for operation from anywhere in the room.
The functionality of the remote varies depending on the specific model, but common features include: Power on/off, Fan speed control (typically with 3-6 speed settings), Light on/off, Light dimming (if the fan includes a dimmable light fixture), Fan direction reversal (for seasonal adjustments to airflow), Timer function (allowing the fan and/or light to be programmed to turn off after a set period), and “Breeze” mode (which simulates natural wind patterns by varying the fan speed). Some advanced remotes may also include features like temperature sensors, which automatically adjust the fan speed based on the room temperature. They might also have a learning function that allows it to be programmed to other devices, such as TVs or speakers.
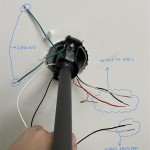
The remote control receiver is typically located within the fan's motor housing. It receives signals from the remote and translates them into commands for the fan motor and light fixture. Pairing the remote to the receiver is usually a straightforward process, often involving pressing a button on the receiver or remote to establish a connection. In cases where multiple ceiling fans are installed in close proximity, it may be necessary to assign unique frequencies to each fan to prevent interference. Remote controls usually include batteries and will require battery replacement. Remote malfunctions can be resolved by replacing the batteries or contacting the manufacturer.
The remote control also impacts the wiring installation. Proper wiring is essential for the safe and effective operation of the ceiling fan. The installation process typically involves connecting the fan's wiring to the existing electrical wiring in the ceiling junction box. The wiring connections must be made according to the manufacturer's instructions and local electrical codes. Incorrect wiring can result in damage to the fan, electrical shock, or fire. For individuals unfamiliar with electrical work, it is recommended to hire a qualified electrician to perform the installation.
The remote control system adds complexity to the fan’s electrical system, however it gives greater control to the user. Some remotes have the ability to control other smart devices through the internet of things, depending on if the fan has that capability.
Installation Considerations and Troubleshooting
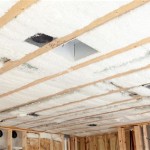
Installing a Hamilton Bay ceiling fan with a remote control requires careful planning and execution. Before beginning the installation process, it is important to ensure that the ceiling junction box is properly supported and rated to handle the weight of the fan. The junction box should be securely mounted to a ceiling joist or support structure. If the existing junction box is not adequate, it may need to be replaced with a fan-rated junction box.
The installation process typically involves the following steps: Turning off the power at the circuit breaker, Removing the existing light fixture or ceiling fan, Attaching the mounting bracket to the junction box, Wiring the fan according to the manufacturer's instructions, Attaching the fan motor housing to the mounting bracket, Installing the fan blades, Attaching the light fixture (if included), Installing the light bulbs, and Pairing the remote control to the receiver.
Detailed installation instructions are usually included with the fan. It is important to read and understand these instructions thoroughly before beginning the installation process. Visual aids, such as diagrams and videos, can also be helpful. If any doubts arise during the installation process, it is best to consult with a qualified electrician.
Troubleshooting common issues can often be done at home. Issues such as the fan not turning on can often be fixed by verifying the power and circuit breaker and ensuring the remote has working batteries. A common problem is the fan wobbling or vibrating during operation. This can often be resolved by ensuring that the fan blades are properly balanced. Balancing kits are available and typically include small weights that can be attached to the blades to correct imbalances. Loose screws can also contribute to wobbling, so it is important to periodically check and tighten all screws on the fan.
If the remote control is not working properly, the batteries should be checked first. If the batteries are good, the remote may need to be re-paired with the receiver. If the fan is still not responding to the remote, there may be a problem with the receiver or the remote itself. In such cases, it may be necessary to contact the manufacturer for assistance or replacement parts. Other potential issues include flickering lights, unusual noises, or motor malfunctions. These issues may require professional attention. In the event of a motor malfunction, it is typically necessary to replace the entire fan.
Cleaning and maintenance are necessary steps to prolong the life of the fan. Regular cleaning of the fan blades and motor housing can help to prevent dust buildup and maintain optimal performance. The blades can be cleaned with a damp cloth or a mild cleaning solution. The motor housing can be wiped down with a dry cloth. It is important to avoid using abrasive cleaners or solvents, as these can damage the fan's finish.

How To Pair Hampton Bay Ceiling Fan Remote Control

Hampton Bay Riley 44 In Indoor Led Brushed Nickel Ceiling Fan With Light Kit 5 Quickinstall Reversible Blades And Remote Control 52144 The Home

Hampton Bay Hawkins Iii 44 In Led Indoor Brushed Nickel Flush Mount Ceiling Fan With Light Yg204d Bn The Home

Hampton Bay Ceiling Fan Remote Control Removal

Hampton Bay Glendale Iii 52 In Led Indoor Brushed Nickel Ceiling Fan With Light And Pull Chains Ak338 Bn The Home

60 Miramar Tal

Instructions For A Hampton Bay Fan Remote

Hampton Bay Zandra 52 Inch Wi Fi Ceiling Fan Review Quiet Efficient And Bright With Many Control Options The Gadgeteer

Reviews For Hampton Bay Campbell 52 In Indoor Led Brushed Nickel Ceiling Fan With Light Kit Downrod Reversible Blades And Remote Pg 2 The Home

Hampton Bay Ceiling Fans The Home