Crown Molding for Cathedral Ceilings: Enhancing Architectural Grandeur
Cathedral ceilings, characterized by their soaring heights and dramatic angles, present both opportunities and challenges when it comes to interior design. Crown molding, a decorative trim traditionally used to adorn the junction between walls and ceilings, can significantly enhance the architectural appeal of a cathedral ceiling. However, its application requires careful consideration of scale, material, and installation techniques to achieve a cohesive and aesthetically pleasing result.
The decision to incorporate crown molding into a space with a cathedral ceiling is often driven by a desire to accentuate the height and volume of the room, add a sense of formality or elegance, or create a visual transition between the wall and ceiling planes. Properly selected and installed crown molding can unify the architecture and décor, resulting in a sophisticated and polished interior.
The unique geometry of cathedral ceilings, typically featuring steeply angled slopes, demands a different approach compared to standard 8-foot ceilings. Simply applying standard crown molding may not yield the desired effect and could even detract from the overall design. Therefore, understanding the specific considerations for crown molding installation in these types of spaces is essential.
Selecting the Right Size and Profile
One of the most crucial aspects of selecting crown molding for a cathedral ceiling is determining the appropriate size and profile. The sheer scale of the ceiling necessitates a larger, more substantial molding than would be used in a room with standard dimensions. A small, delicate molding will appear insignificant and lost against the vast expanse of the ceiling, failing to create the desired visual impact.
As a general guideline, the height of the crown molding should be proportional to the height of the ceiling. For cathedral ceilings reaching 12 feet or higher, consider moldings with a vertical projection of at least 6 to 8 inches. Larger rooms and ceilings may even benefit from moldings exceeding 10 inches in height. The room’s overall dimensions play a vital role in this determination; a very large room can visually handle a greater molding height without appearing disproportionate. Conversely, a smaller room, even with a cathedral ceiling, may necessitate a slightly smaller molding to maintain balance.
The profile of the crown molding also influences its visual impact. Ornate, heavily detailed profiles can create a more formal and traditional aesthetic, while simpler, cleaner lines offer a more contemporary feel. It's important to consider the existing architectural style of the house and the overall design intent of the room. A modern home might benefit from a minimalist crown molding profile, whereas a traditional home could accommodate a more elaborate design.
Furthermore, consider the sight lines from various locations within the room. From standing height, the crown molding should appear balanced and visually appealing. A test using sample moldings, held in place temporarily, can help visualize the effect before making a final decision. This allows assessment under different lighting conditions and from various perspectives within the space.
Material Considerations: Weight and Stability
The choice of material for crown molding in a cathedral ceiling installation is also a significant factor. Traditional wood moldings, such as pine, poplar, or even hardwoods like oak or maple, offer a classic and elegant look. Wood moldings can be stained or painted to match the existing trim and décor, providing a high degree of customization.
However, wood moldings can be relatively heavy, especially in the larger sizes required for cathedral ceilings. This weight can pose challenges during installation, requiring more robust support and potentially increasing the risk of sagging or movement over time. Furthermore, wood is susceptible to changes in humidity, which can cause it to expand and contract, potentially leading to cracks or gaps in the molding.
Polyurethane crown molding presents an alternative to wood, offering several advantages. Polyurethane is significantly lighter than wood, making it easier to handle and install. It is also resistant to moisture, preventing warping, cracking, or rotting. Polyurethane moldings are available in a wide range of styles and profiles, mimicking the look of traditional wood moldings while offering improved durability and stability.
Another option is medium-density fiberboard (MDF) crown molding. MDF is a composite material made from wood fibers and resin, offering a smooth, uniform surface that is ideal for painting. MDF is generally more affordable than solid wood and is less prone to warping or cracking. However, it is not as moisture-resistant as polyurethane and should be protected from excessive humidity.
When selecting the material, consider the complexity of the installation and the long-term maintenance requirements. Lighter materials like polyurethane are often preferred for DIY installations, while wood moldings may require professional installation due to their weight and the skill required for precise cuts and joinery.
Installation Techniques: Addressing Angles and Support
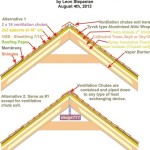
Installing crown molding on a cathedral ceiling requires careful planning and precise execution, particularly when dealing with the non-standard angles inherent in these ceilings. Unlike a standard 90-degree wall-ceiling junction, cathedral ceilings often feature acute or obtuse angles that necessitate accurately mitered cuts for a seamless transition.
A compound miter saw is an essential tool for this type of project, allowing for both angle and bevel cuts to be made simultaneously. Accurate measurements are crucial, and it is recommended to create test cuts on scrap material before cutting the actual molding. Slight variations in the angle of the ceiling can occur, so it's important to measure each corner individually to ensure a perfect fit.
One common technique for dealing with irregular angles is to use "spring angles." The spring angle refers to the angle at which the crown molding sits against the wall and ceiling. For standard 90-degree corners, the spring angle is typically 45 degrees. However, for cathedral ceilings, the spring angle will vary depending on the angle of the ceiling. Determining the correct spring angle is crucial for accurate miter cuts.
Proper support is also essential for crown molding installation on cathedral ceilings. Due to the weight of the molding and the angled surfaces, it's important to use construction adhesive in addition to nails or screws to secure the molding to the wall and ceiling. The adhesive helps to create a strong bond and prevents the molding from shifting or sagging over time.
For longer runs of crown molding, consider using backing blocks or cleats to provide additional support. These can be made from scrap wood and attached to the wall and ceiling at regular intervals. The crown molding can then be attached to the backing blocks, distributing the weight and preventing sagging. Backing blocks are particularly important when using heavier moldings, such as solid wood.
Furthermore, pay close attention to the seams between sections of crown molding. Use wood filler or caulk to fill any gaps or imperfections, creating a smooth, seamless appearance. Sand the filler smooth and then paint or stain the molding to match the existing trim.
Consider the use of flexible crown molding for curved or arched sections of a cathedral ceiling. Flexible molding is typically made from polyurethane or rubber and can be bent to conform to curved surfaces. This eliminates the need for multiple miter cuts and provides a smooth, continuous transition.
Lighting also factors into the installation. Crown molding can be used to conceal indirect lighting, creating a soft and ambient glow that accentuates the architecture of the cathedral ceiling. Consider installing LED strip lights behind the crown molding to add a touch of elegance and sophistication.
In summary, the successful installation of crown molding in a space with a cathedral ceiling hinges on meticulous planning, accurate measurements, and precise execution. Selecting the appropriate size and profile, considering the weight and stability of the material, and employing proper installation techniques are all essential for achieving a visually stunning and structurally sound result. While a DIY approach is possible, professional installation is often recommended, particularly for complex projects or when working with heavy or expensive materials. The transformative impact of well-chosen and expertly installed crown molding can significantly elevate the architectural grandeur of a cathedral ceiling, creating a truly captivating and impressive space.

How To Install Crown Molding On Vaulted Or Cathedral Ceilings The Joy Of Moldings

How To Install Crown Molding On Vaulted Or Cathedral Ceilings The Joy Of Moldings

Running Crown On Cathedral Ceilings

Installing Crown Molding Around A Cathedral Ceiling Fine Homebuilding

Crown Molding Vaulted Ceiling S On A Corners Look Master Bedroom

Installing Crown Molding On A Vaulted Ceiling Pro Construction Guide

Installing Crown Moulding Part Two Canadian Woodworking

Crown Molding On Angled Ceilings Makely

Install Crown Molding Cathedral Vaulted Ceiling

Crown Molding On Vaulted Ceiling
Related Posts