Chandelier Height for 9 Foot Ceilings: A Comprehensive Guide
Determining the appropriate chandelier height for a room with a 9-foot ceiling is crucial for both aesthetic appeal and functional lighting. The correct height ensures the chandelier illuminates the space effectively without overwhelming it, while also preventing potential hazards such as head collisions. This guide outlines the key considerations and provides recommendations for selecting and installing a chandelier at the proper height in a room with a 9-foot ceiling. Aspects to consider include the room's purpose, the fixture's size and style, and any furniture beneath the chandelier.
Understanding Standard Guidelines for Chandelier Height
General guidelines provide a starting point for determining chandelier height. For rooms with standard 8-foot ceilings, a chandelier should typically hang 2.5 to 3 feet (30-36 inches) above the floor. These measurements are based on allowing adequate headroom and preventing obstructions of views across the room. However, with a 9-foot ceiling, these dimensions need to be adjusted to maintain visual balance and proportion. An additional foot of ceiling height allows for raising the chandelier to avoid creating a low-hanging effect. Therefore, for a 9-foot ceiling, a chandelier typically should hang at least 3 to 3.5 feet (36-42 inches) above the floor.
It is important to remember that these are just guidelines. The ideal height can vary depending on the size and design of the chandelier and the overall aesthetic of the room. A larger, more ornate chandelier may require a higher hanging point to avoid feeling imposing, while a smaller, more minimalist fixture could be positioned slightly lower.
Furthermore, it is essential to consider the placement of the chandelier. If it is installed in an open area, the primary concern is ensuring adequate headroom. However, if the chandelier is positioned above a table or other furniture, different rules apply. These scenarios are explored in detail in subsequent sections.
Adjusting Chandelier Height Over a Dining Table
When hanging a chandelier above a dining table, the optimal height is dictated by creating a functional and visually pleasing focal point. The goal is to provide sufficient light for dining and conversation while avoiding obstructions. A common recommendation is to hang the chandelier 30 to 36 inches above the tabletop. This measurement ensures that individuals seated at the table can easily see each other and converse without being blinded by the light source.
For 9-foot ceilings, this measurement can be adjusted slightly upward. A height of 33 to 39 inches above the tabletop may provide a better visual balance, particularly with larger or more elaborate chandelier designs. The specific height will depend on the chandelier's dimensions and the overall scale of the dining room. It is advisable to temporarily suspend the chandelier at different heights to visually assess the effect before permanently installing it. This process allows for fine-tuning the height to achieve the desired aesthetic and functionality.
The shape and size of the dining table also influence the ideal chandelier height. A longer table may benefit from a slightly higher chandelier to distribute light more evenly across the surface. A narrower table may require a lower placement to concentrate the light. Therefore, it's vital to consider all dining room elements when determining the best chandelier height.
Considerations for Chandeliers in Entryways and Hallways
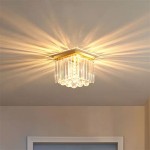
Entryways and hallways often serve as the first impression of a home, making the chandelier choice and its hanging height particularly significant. The placement should be welcoming and visually appealing without posing safety hazards. In these spaces, the bottom of the chandelier should ideally be at least 7 feet above the floor. This height ensures adequate headroom for individuals passing underneath and prevents accidental contact with the fixture.
For a 9-foot ceiling, applying the 7-foot clearance rule leaves two feet for the chandelier's height. Select a chandelier that fits within this dimensional constraint to achieve the desired visual effect without feeling cramped. If the entryway or hallway is particularly narrow, a shallower chandelier design may be preferable to avoid obstructing the passage.
In larger entryways or foyers, the chandelier can be a more substantial design, serving as a statement piece. In these cases, it is especially important to consider the overall proportions of the space. The chandelier should complement the size and style of the entryway without overpowering it. Temporarily hanging the fixture at different heights before permanent installation is essential for achieving optimal placement. Furthermore, consider the effect the chandelier has on the view from the front door and other entry points. It should serve as an inviting focal point, enhancing the overall aesthetic of the space.
The Impact of Chandelier Size and Style on Hanging Height
The size and style of a chandelier directly influence the perceived optimal hanging height. Larger, more imposing chandeliers often require greater clearance to avoid visually overwhelming a space. A general rule of thumb is that the diameter of the chandelier (in inches) should be roughly equivalent to the sum of the room's length and width (in feet). For instance, in a room that is 12 feet long and 10 feet wide, a chandelier with a diameter of approximately 22 inches may be appropriately sized.
However, this is just a guideline. A chandelier with a complex design or an abundance of decorative elements may appear larger than its actual dimensions suggest. In such cases, it may be necessary to raise the hanging height slightly to maintain a sense of balance. Conversely, a minimalist or transparent chandelier design may be positioned lower without creating visual clutter.
The style of the chandelier also plays a crucial role. A traditional chandelier with cascading crystals and ornate detailing will likely require a higher hanging point compared to a modern chandelier with a sleek, minimalist design. The choice between these styles is governed by the overall aesthetic of the room as well as the homeowner's personal preferences.
Adjusting Chain or Rod Length for Optimal Placement
Most chandeliers are supplied with adjustable chains or rods to facilitate customization of the hanging height. Understanding how to properly adjust these elements is essential for achieving the optimal placement. Prior to installation, carefully measure the desired distance from the ceiling to the bottom of the chandelier. Account for the height of the chandelier itself and subtract this value from the total ceiling height. This calculation will determine the required length of the chain or rod.
When shortening a chain, use appropriate tools to remove the excess links. Ensure that the remaining links are securely connected to prevent the chandelier from falling. When adjusting a rod, follow the manufacturer's instructions carefully. Some rods may be threaded, allowing for incremental adjustments, while others may require cutting to the desired length. If cutting is needed, it is essential to use the proper tools and techniques to ensure a clean, straight cut. Any exposed edges should be filed smooth to prevent injury.
After the chain or rod has been adjusted, double-check the overall height by temporarily suspending the chandelier. This allows for a final visual assessment before permanently securing the fixture. It is advisable to have a second person assist with this process to ensure safety and accuracy.
Safety Considerations During Chandelier Installation
Safety is paramount during any electrical installation, including installing a chandelier. Prior to commencing work, always turn off the power to the circuit at the breaker box. Verify that the power is off using a non-contact voltage tester. This step is essential to prevent electric shock.
Ensure that the ceiling junction box is properly rated to support the weight of the chandelier. Most junction boxes are labeled with their maximum weight capacity. If the chandelier exceeds this capacity, the junction box may need to be replaced with a heavier-duty model. Consult with a qualified electrician if you are unsure about the appropriate type of junction box to use.
When lifting the chandelier into position, use a sturdy ladder or scaffolding. Have an assistant help with lifting and positioning the fixture. Secure the chandelier to the junction box according to the manufacturer's instructions. Ensure that all wiring connections are properly made and that the wires are securely capped to prevent short circuits. After the installation is complete, carefully test the chandelier by turning on the power to the circuit. If any problems are detected, immediately turn off the power and consult with a qualified electrician.

Ace Wrought Iron Chandelier Size And Height Guide

Picking The Perfect Chandelier Size For Your Room Hk Interiors

Lighting Tips How To Light A Dining Area

The Right Height To Hang A Chandelier Above Table All Details

Kichler Hendrik 9 Light Chandelier In Brushed Nickel 1674ni

Chandelier Height Guide Choosing The Right Size Lighting For Your Home

Chandelier Height Guide Choosing The Right Size Lighting For Your Home

Chandeliers For 9 Foot Ceilings Every Style And Budget

What Size Hanging Lighting Works Best In A Foyer

The How To Lighting Guide Lightology