Bathroom Exhaust Fan Installation in a Drop Ceiling: A Comprehensive Guide
Bathroom exhaust fans are essential components of a well-ventilated bathroom. They effectively remove excess moisture and odors, mitigating the risk of mold growth, structural damage, and unpleasant air quality. When installing a bathroom exhaust fan, the ceiling type plays a crucial role in determining the appropriate installation methods and hardware. Drop ceilings, also known as suspended ceilings or T-bar ceilings, present unique challenges and considerations compared to drywall or plaster ceilings. This article provides a detailed guide to installing a bathroom exhaust fan in a drop ceiling, covering key points from initial planning to final execution.
Understanding Drop Ceiling Construction
A drop ceiling consists of a grid of metal runners suspended from the structural ceiling above. These runners form square or rectangular openings into which lightweight ceiling tiles are placed. This suspended structure creates a cavity between the drop ceiling and the structural ceiling, often used to conceal wiring, plumbing, and HVAC ductwork. The load-bearing capacity of a drop ceiling is significantly less than that of a solid ceiling; therefore, traditional mounting methods used for drywall or plaster ceilings are generally unsuitable. Attaching a heavy fan directly to a single drop ceiling tile is almost certain to result in failure, potentially damaging the ceiling and creating a safety hazard.
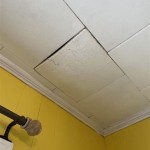
Before commencing any installation work, a thorough inspection of the existing drop ceiling is crucial. Assess the condition of the metal grid, paying particular attention to any signs of rust, bending, or damage. Determine the spacing between the runners and the size of the ceiling tiles. Note the location of any existing light fixtures, vents, or other obstructions. This information will be critical for selecting an appropriate fan model and devising a secure mounting strategy.
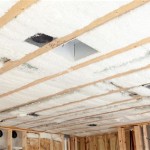
Furthermore, it is imperative to verify that sufficient space exists above the drop ceiling to accommodate the fan housing and ductwork. Measuring the height of the cavity between the drop ceiling and the structural ceiling is essential. Consult the manufacturer's specifications for the chosen fan model to ensure adequate clearance. If the space is limited, a low-profile fan may be necessary. It is also important to confirm there is a viable path for the exhaust duct to vent to the outside, complying with local building codes and regulations. This may involve routing the duct through an exterior wall or the roof.
Essential Steps for Safe and Effective Installation
Installing a bathroom exhaust fan in a drop ceiling requires meticulous planning and adherence to safety guidelines. The following steps outline the key procedures for ensuring a successful and safe installation.
1. Power Disconnection and Safety Precautions: Before starting any electrical work, it is absolutely essential to disconnect the power to the circuit that will be used to power the fan. Locate the appropriate circuit breaker in the electrical panel and switch it to the "off" position. To verify that the power is indeed disconnected, use a non-contact voltage tester to check the wires at the intended wiring location. Always prioritize safety and work in a well-lit area. Wear appropriate personal protective equipment (PPE), including safety glasses and work gloves.
2. Choosing the Right Fan and Mounting Hardware: The selection of the bathroom exhaust fan is critical. Consider the size of the bathroom to determine the appropriate cubic feet per minute (CFM) rating. A fan that is too small will not adequately ventilate the space, while a fan that is too large may be unnecessarily noisy and energy-inefficient. Look for fans that are specifically designed for installation in drop ceilings or that can be adapted for such installations. These fans often come with mounting brackets or straps that distribute the weight across multiple ceiling grid runners. If the chosen fan does not include suitable mounting hardware, it may be necessary to purchase aftermarket brackets or fabricate custom supports. Ensure that all mounting hardware is robust enough to support the weight of the fan and that it is compatible with the drop ceiling grid system.
3. Preparing the Drop Ceiling Grid: The key to a secure installation is to distribute the weight of the fan across multiple metal grid runners. This can be achieved by using metal straps or bars that span several runners. Attach these straps or bars to the runners using screws or clamps, ensuring a tight and secure connection. For added support, consider using metal angle brackets to reinforce the connections between the straps and the runners. The goal is to create a stable platform that can support the weight of the fan without causing the drop ceiling grid to sag or bend. Carefully measure and cut the ceiling tile to create an opening for the fan housing. Use a utility knife or a specialized ceiling tile cutter to achieve a clean and precise cut. Ensure that the opening is slightly larger than the fan housing to allow for easy installation and removal.
4. Installing the Fan Housing and Ductwork: Carefully lift the fan housing into the prepared opening in the drop ceiling. Position the housing so that it rests securely on the support straps or bars that have been attached to the grid runners. Secure the housing to the support structure using screws or bolts, ensuring that the fan is level and stable. Connect the exhaust duct to the fan housing. Use metal duct tape to seal all joints and connections, preventing air leaks. The duct should be routed to the exterior of the building, either through an exterior wall or the roof. Ensure that the duct is properly insulated to prevent condensation and energy loss. If the duct runs through an unheated space, such as an attic, it is especially important to insulate it well. Follow all local building codes and regulations regarding ductwork installation.
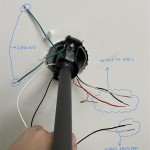
5. Wiring the Fan: With the power disconnected (as described in step 1), connect the electrical wires to the fan according to the manufacturer's instructions. Typically, this will involve connecting the black wire (hot) to the black wire from the electrical supply, the white wire (neutral) to the white wire from the electrical supply, and the green or bare wire (ground) to the ground wire from the electrical supply. Use wire connectors to make secure and insulated connections. Ensure that all connections are tight and that no bare wires are exposed. Carefully tuck the wires into the wiring compartment of the fan housing and replace the cover plate. Double-check all wiring connections before proceeding to the next step.
6. Testing and Final Adjustments: Once the wiring is complete, restore power to the circuit by switching the circuit breaker back to the "on" position. Turn on the fan and verify that it is operating correctly. Check for any unusual noises or vibrations. Ensure that the fan is effectively exhausting air from the bathroom. If the fan is not functioning properly, immediately disconnect the power and troubleshoot the wiring and connections. Make any necessary adjustments to the fan housing or ductwork to ensure optimal performance. Replace the ceiling tile around the fan housing, ensuring a snug and secure fit. Clean up any debris or dust from the installation process.
Key Considerations for Long-Term Performance and Maintenance
To ensure the long-term performance and reliability of the bathroom exhaust fan, it is essential to address several key considerations regarding maintenance and operation.
Regular Cleaning: Bathroom exhaust fans can accumulate dust and debris over time, which can reduce their efficiency and increase noise levels. Regular cleaning of the fan blades and housing is essential for maintaining optimal performance. Disconnect the power to the fan before cleaning. Use a soft brush or vacuum cleaner to remove dust and debris from the fan blades and housing. For stubborn dirt or grime, use a damp cloth with mild soap and water. Ensure that all parts are completely dry before restoring power to the fan. The frequency of cleaning will depend on the bathroom's usage and the level of dust and debris in the air. A good rule of thumb is to clean the fan at least twice a year.
Ductwork Inspection: Periodically inspect the exhaust ductwork for any obstructions or damage. Animal nests, debris, or collapsed sections of ductwork can significantly reduce the fan's effectiveness. If any obstructions are found, remove them carefully. If the ductwork is damaged, repair or replace it as needed. Ensure that all duct connections are sealed tightly to prevent air leaks. Regular inspection of the ductwork can help to identify and address potential problems before they become serious.
Motor Lubrication (If Applicable): Some older bathroom exhaust fans have motors that require periodic lubrication. Consult the manufacturer's instructions to determine if the fan's motor needs lubrication and, if so, what type of lubricant to use. Apply the lubricant sparingly to the appropriate lubrication points. Over-lubrication can be just as harmful as under-lubrication. Newer fans often have sealed motors that do not require lubrication.
Addressing Excessive Noise: If the bathroom exhaust fan becomes excessively noisy, it may indicate a problem with the motor, fan blades, or mounting. Check the fan blades for any damage or imbalance. Ensure that the fan housing is securely mounted and that there are no loose parts. If the noise persists, the motor may be failing and need to be replaced. Consider replacing an older, noisy fan with a newer, quieter model.
By adhering to these guidelines, homeowners can successfully install and maintain a bathroom exhaust fan in a drop ceiling, ensuring proper ventilation and a healthy bathroom environment.

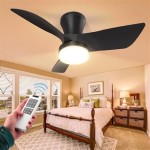
2 X Ceiling Tile Fan Led Light With Remote 1800ceiling

Drop Ceiling Exhaust Fan Installation Uses

2 X Ceiling Tile Fan Led Light With Remote 1800ceiling

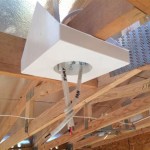
How To Install Drop Ceiling Tiles For A Bathroom Diy Danielle

How To Install Bath Fans In Suspended Ceilings

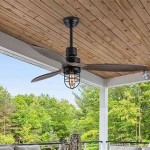
Air King Energy Star Certified Quiet 280 Cfm Ceiling Bathroom Exhaust Fan Ak280ls The Home

Air King Ak200ls 200 Cfm Quiet Bathroom Exhaust Fan Ceiling Mount 6 Inch Duct

2 X Ceiling Tile Fan Led Light With Remote

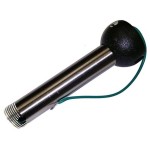
Bathroom Exhaust Fan Product Sp B110 Qd 50 133 Cfm

Installing An Exhaust Fan During A Bathroom Remodel Greenbuildingadvisor