Adding Ceiling Lights to a Room: A Comprehensive Guide
Ceiling lights are a fundamental element of any well-lit living space. They provide ambient illumination, contributing significantly to the room's overall aesthetic and functionality. Choosing and installing the right ceiling lighting fixture requires careful consideration of various factors, including room size, existing electrical infrastructure, desired light output, and personal preferences. This article offers a comprehensive guide to adding ceiling lights to a room, covering key aspects from planning and preparation to installation and troubleshooting.
Assessing Lighting Needs and Fixture Selection
Before embarking on the installation process, it is crucial to evaluate the room's specific lighting requirements. This evaluation involves considering the room's dimensions, purpose, and existing light sources. A large living room will naturally require more light than a small bedroom. Similarly, a home office or kitchen, where tasks requiring focused illumination are performed, will necessitate brighter and more directional lighting compared to a relaxing lounge area.
The selection of the appropriate ceiling light fixture is equally important. There are numerous types of ceiling lights available, each offering unique features and aesthetic appeal. Common options include:
*Flush Mount Lights:
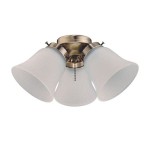
These fixtures are mounted directly to the ceiling, offering a low profile and suitability for rooms with low ceilings. They provide general ambient lighting and are available in various styles, from simple and functional to decorative and ornate. *Semi-Flush Mount Lights:
Similar to flush mount lights, but with a small gap between the fixture and the ceiling. This allows for a slightly more decorative design and increased light distribution. *Chandeliers:
Ideal for dining rooms, entryways, or living rooms, chandeliers provide both ambient and decorative lighting. They are available in a wide range of sizes, styles, and materials, from traditional crystal chandeliers to modern, minimalist designs. *Pendant Lights:
Suspended from the ceiling by a chain, rod, or cord, pendant lights offer focused or ambient lighting. They are commonly used over kitchen islands, dining tables, or in entryways. Single pendants or clusters of pendants can be used to create a variety of lighting effects. *Recessed Lights (Pot Lights):
These fixtures are installed within the ceiling, offering a clean and unobtrusive look. They provide focused downlighting and are often used in kitchens, bathrooms, and hallways. Recessed lighting can be strategically placed to highlight specific areas or objects within the room. *Track Lighting:
Consisting of multiple light fixtures mounted on a track, track lighting offers flexibility and versatility. The individual lights can be adjusted to direct light where needed, making it suitable for highlighting artwork, architectural features, or task areas.When selecting a fixture, consider the light output, measured in lumens. Different activities require different levels of illumination. For example, reading requires more lumens than watching television. The color temperature of the light, measured in Kelvin (K), also affects the room's ambiance. Warmer light (lower Kelvin) creates a cozy and relaxing atmosphere, while cooler light (higher Kelvin) provides a brighter and more energizing environment.
Furthermore, determine whether the existing electrical wiring is sufficient to support the new fixture. This involves checking the voltage and amperage ratings of the circuit and ensuring they are compatible with the fixture's requirements. Consulting with a qualified electrician is recommended to avoid overloading the circuit and creating a fire hazard.
Preparing for Installation: Safety and Tools
Safety is paramount when working with electricity. Before starting any electrical work, it is essential to turn off the power to the circuit at the breaker box. Verify that the power is off using a non-contact voltage tester. This will prevent electric shock and ensure a safe working environment.
Gather the necessary tools and materials before beginning the installation. Essential tools include:
*Non-Contact Voltage Tester:
To confirm that the power is off. *Screwdrivers (various sizes and types):
For loosening and tightening screws. *Wire Strippers/Crimpers:
To strip insulation from wires and crimp wire connectors. *Pliers:
For bending and manipulating wires. *Electrical Tape:
To insulate wire connections. *Wire Connectors (wire nuts):
To securely connect wires. *Drill with appropriate drill bits:
For creating mounting holes. *Ladder or Step Stool:
To reach the ceiling. *Safety Glasses:
To protect eyes from debris. *Gloves:
To provide insulation and protect hands. *Pencil:
For marking locations. *Measuring Tape:
To accurately measure distances. *Level:
To ensure the fixture is installed straight.In addition to these essential tools, ensure that the new light fixture contains all necessary mounting hardware, including screws, brackets, and wire connectors. Carefully read the manufacturer's instructions before beginning the installation process.
If there is no existing electrical box at the desired location, one will need to be installed. This typically involves running new wiring from an existing circuit to the new location. This task is best left to a qualified electrician, as it requires knowledge of electrical codes and safe wiring practices.
Installing the Ceiling Light Fixture: Step-by-Step Guide
The installation process will vary depending on the type of fixture and the existing electrical infrastructure. However, the following steps provide a general guideline:
1.Turn off the Power:
As emphasized earlier, ensure the power to the circuit is turned off at the breaker box and verified with a non-contact voltage tester. 2.Remove the Old Fixture (if applicable):
Carefully remove the old fixture, disconnecting the wires one at a time. Use a screwdriver to loosen the wire connectors and separate the wires. Note the color coding of the wires (black, white, and ground) to ensure proper reconnection with the new fixture. 3.Install the Mounting Bracket:
The mounting bracket is the support structure that attaches the fixture to the ceiling. Secure the mounting bracket to the electrical box using screws. Ensure the bracket is properly aligned and securely fastened. 4.Connect the Wires:
Connect the wires from the fixture to the wires from the electrical box, matching the color coding: black to black (hot), white to white (neutral), and green or bare copper to green or bare copper (ground). Use wire connectors (wire nuts) to securely connect the wires. Twist the wires together tightly and then screw on the wire connector. Wrap the connection with electrical tape for added insulation. 5.Attach the Fixture to the Mounting Bracket:
Carefully lift the fixture and align it with the mounting bracket. Secure the fixture to the bracket using screws or other fasteners as specified by the manufacturer. Ensure the fixture is securely attached and level. 6.Install the Bulb and Shade (if applicable):
Install the bulb according to the manufacturer's instructions. If the fixture has a shade or cover, attach it securely. 7.Turn on the Power:
Once the installation is complete, turn on the power at the breaker box and test the fixture to ensure it is working properly.If the fixture does not work or flickers, immediately turn off the power and recheck the wiring connections. Ensure that all wires are securely connected and that there are no loose strands. If the problem persists, consult with a qualified electrician.
Different fixture types may have specific installation requirements. For instance, recessed lighting installation may involve cutting holes in the ceiling and installing can housings. Pendant light installation may require adjusting the length of the chain or cord. Consulting the manufacturer's instructions and seeking professional assistance when needed are crucial for a successful and safe installation.

9 Types Of False Ceiling Light Designs To Glam Up Your Home

Lighting Tips For Every Room Hgtv

3 Best False Ceiling Lights You Can Use To Create Better Ambience

Low Ceiling Lighting Ideas For Your Home Designcafe

False Ceiling Light Options For Your Living Room Design Cafe

A Comprehensive Guide To The Best Ceiling Lights Designs For Your Home

False Ceiling Light Options For Your Living Room Design Cafe

Add Lighting With Little Or No Damage Fielder Electric

False Ceiling Light Options For Your Living Room Design Cafe

A Comprehensive Guide To The Best Ceiling Lights Designs For Your Home
Related Posts