```html
How To Fix a Plaster Ceiling Hole
Plaster ceilings, while often adding a touch of architectural charm, are susceptible to damage. Holes, whether caused by accidental impact, water damage, or general wear and tear, detract from the aesthetic appeal and can compromise the structural integrity of the ceiling. Repairing a plaster ceiling hole requires understanding the nature of plaster, the appropriate tools, and the correct techniques to ensure a durable and seamless repair. This article outlines a comprehensive approach to fixing a plaster ceiling hole, guiding the reader through each step of the process.
Assessing the Damage and Gathering Materials
Before commencing any repair work, a thorough assessment of the damage is crucial. The size of the hole, the condition of the surrounding plaster, and the presence of any underlying damage (such as water stains indicating a leak) will dictate the approach and materials required. Small holes, generally less than a few inches in diameter, can be repaired with a patch compound. Larger holes, however, necessitate a more substantial repair, often involving the addition of a backing material and multiple layers of plaster.
The following materials are generally required for repairing a plaster ceiling hole:
- Dust mask and eye protection: To protect from dust and debris.
- Drop cloth or plastic sheeting: To protect the floor and furniture from dust and debris.
- Utility knife or scoring tool: To remove loose plaster and create a clean edge around the hole.
- Vacuum cleaner with brush attachment: To remove loose debris and dust from the hole and surrounding area.
- Plaster of Paris or patching compound: For filling small holes and cracks.
- Joint compound (all-purpose and topping): For larger repairs and creating a smooth finish.
- Mesh tape or fiberglass tape: For reinforcing the patch and preventing cracks.
- Wooden furring strips or lath: For creating a backing support for larger holes.
- Screws or nails: For attaching the furring strips or lath.
- Drill (if using screws): For securing the furring strips or lath.
- Trowel or putty knife (various sizes): For applying and smoothing the patching compound and joint compound.
- Sanding sponge or sandpaper (various grits): For smoothing the repaired area and blending it with the surrounding ceiling.
- Primer: To prepare the repaired area for painting.
- Paint: To match the existing ceiling color and finish.
- Paintbrush or roller: For applying the primer and paint.
The specific quantities of materials will depend on the size and severity of the hole being repaired. It is generally recommended to purchase a slightly larger quantity of materials than estimated to account for waste and potential errors.
Preparing the Hole for Repair
Proper preparation is essential for a successful and lasting repair. This involves cleaning the hole and ensuring a stable and sound foundation for the patching material.
First, use a utility knife or scoring tool to carefully remove any loose or crumbling plaster around the edge of the hole. This creates a clean, stable edge for the patching material to adhere to. Angling the cut slightly inward, creating a beveled edge, can further improve adhesion and reduce the likelihood of cracking.
Next, use a vacuum cleaner with a brush attachment to thoroughly remove all dust and debris from the hole and the surrounding area. This is critical for ensuring proper adhesion of the patching material. A damp sponge can also be used to wipe down the area, but ensure it is completely dry before proceeding.
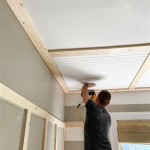
For larger holes, it may be necessary to install a backing support. This provides a solid foundation for the patching material and prevents it from sagging or falling through. Cut wooden furring strips or lath to fit snugly within the hole, extending slightly beyond the edges. Secure the furring strips or lath to the existing plaster using screws or nails. Ensure the backing is flush with or slightly recessed from the surrounding plaster surface.
Applying a bonding agent to the exposed edges of the existing plaster can further enhance adhesion. Follow the manufacturer's instructions for application and drying time.
Applying the Patching Material
The method for applying the patching material will vary depending on the size of the hole and the type of material being used. For small holes and cracks, a pre-mixed patching compound or plaster of Paris can be used. For larger holes, joint compound is typically used in multiple layers.
When using patching compound or plaster of Paris, mix the material according to the manufacturer's instructions. Apply the mixture to the hole using a trowel or putty knife, pressing it firmly into the cavity to ensure good adhesion. Overfill the hole slightly, as the material will shrink as it dries.
For larger holes requiring joint compound, the process involves multiple layers. First, apply a layer of all-purpose joint compound to the hole, covering the backing support (if used) and extending slightly beyond the edges of the hole onto the existing plaster. Embed mesh tape or fiberglass tape into the wet compound, covering the entire hole and pressing it firmly into the surface. This reinforces the patch and prevents cracking.
Allow the first layer of joint compound to dry completely, according to the manufacturer's instructions. This may take several hours or even overnight. Once dry, apply a second layer of all-purpose joint compound, feathering the edges of the patch to blend it smoothly with the surrounding ceiling. Again, allow the compound to dry completely.
Finally, apply a thin layer of topping joint compound to the entire patch, feathering the edges carefully to create a seamless transition. Topping compound is finer and easier to sand than all-purpose compound, resulting in a smoother finish.
Sanding and Finishing the Repair
Once the final layer of joint compound is completely dry, it is time to sand the repaired area to create a smooth, even surface. This step requires patience and attention to detail to ensure a seamless blend with the surrounding ceiling.
Use a sanding sponge or sandpaper (starting with a coarser grit, such as 120-grit, and gradually progressing to a finer grit, such as 220-grit) to carefully sand the repaired area. Avoid sanding too aggressively, as this can damage the surrounding plaster. Focus on feathering the edges of the patch to create a smooth, gradual transition.
After sanding, use a damp sponge to wipe away any dust and debris. Inspect the repaired area carefully for any imperfections, such as small holes or ridges. If necessary, apply another thin layer of topping compound to fill these imperfections and repeat the sanding process.
Once the repaired area is smooth and even, apply a primer to prepare it for painting. Primer helps to seal the surface and promote adhesion of the paint. Allow the primer to dry completely before painting.
Finally, paint the repaired area with a paint that matches the existing ceiling color and finish. Apply multiple thin coats of paint, allowing each coat to dry completely before applying the next. This will ensure a uniform color and a durable finish.
Proper ventilation is recommended during sanding, priming, and painting. Wear a dust mask and eye protection to protect from dust and fumes.
```
How Can I Fix A Large Hole In Plaster Ceiling That S Backed By Drywall Instead Of Wood Lath Home Improvement Stack Exchange

How To Repair Plaster Ceiling Step By Diy Fix Hole In A

How To Repair A Ceiling Ideas Advice B Q

How To Patch And Repair A Hole In The Ceiling Diy Great Home Ideas

How Can I Repair A Hole Punched Through My Ceiling Plaster Home Improvement Stack Exchange

3 Ways To Fix Holes In A Ceiling Wikihow

How To Patch A Hole In Textured Ceiling Ask This Old House Youtube

How To Repair A Large Drywall Hole In Your Ceiling Thrift Diving

How To Fix A Large Hole In Wall Guide For N Homes

How To Repair A Ceiling Ideas Advice B Q