How To Fix a Bathroom Ceiling That Is Peeling
Peeling paint on a bathroom ceiling is a common problem, frequently stemming from excessive moisture. Bathrooms, by their very nature, are subject to high humidity levels due to showering, bathing, and handwashing. This moisture can penetrate the paint layer, causing it to lose adhesion and eventually peel away from the underlying surface. Addressing this issue promptly and thoroughly is essential to prevent further damage to the ceiling and to maintain a healthy and aesthetically pleasing bathroom environment. The fix involves identifying the root cause, preparing the surface, and applying appropriate materials.
Ignoring peeling paint can lead to more serious problems. The exposed ceiling material, whether drywall or plaster, becomes vulnerable to water damage. This can result in mold growth, structural weakening, and potentially costly repairs. Mold, in particular, poses a health risk, triggering allergies and respiratory problems. Therefore, tackling the peeling paint as soon as it's noticed is crucial.
Identifying the Cause of Peeling Paint
Before attempting to repair the peeling paint, it is necessary to pinpoint the underlying cause. Addressing the symptoms without resolving the source will only lead to the problem recurring. Several factors can contribute to peeling paint in a bathroom.
Poor Ventilation: Inadequate ventilation is a primary culprit. If the bathroom lacks a functioning exhaust fan or proper airflow, moisture will linger in the air, condensing on surfaces like the ceiling. Over time, this continuous exposure to moisture weakens the paint’s bond. A properly functioning exhaust fan should be used during and after every shower or bath and should be sized appropriately for the bathroom's square footage.
Lack of Primer: The absence of a primer coat beneath the paint layer can also cause peeling. Primer acts as a bonding agent, creating a stable surface for the paint to adhere to. Without primer, the paint may not properly adhere to the ceiling material, making it susceptible to peeling, especially in a humid environment. The type of primer used also matters; a moisture-resistant primer is essential for bathrooms.
Cheap Paint: The quality of the paint significantly impacts its durability and moisture resistance. Inexpensive paints often lack the necessary binders and additives to withstand the high humidity levels in bathrooms. These paints are more porous and allow moisture to penetrate, leading to peeling. Using a high-quality, moisture-resistant paint specifically formulated for bathrooms is therefore crucial.
Water Leaks: Undetected water leaks from pipes above the bathroom ceiling can also cause paint to peel. These leaks may be slow and gradual, making them difficult to detect until the damage is significant. Inspecting the areas above the bathroom for any signs of leaks, such as water stains or dampness, is crucial.
Multiple Layers of Paint: Applying too many layers of paint over time can create a thick, brittle surface that is prone to cracking and peeling. Each additional layer adds weight and stress to the underlying layers, eventually causing them to separate from the ceiling material. Prior preparation, including scraping and sanding, is important when repainting over existing paint layers.
Preparing the Bathroom Ceiling for Repair
Proper surface preparation is essential for ensuring a successful and long-lasting repair. Rushing this step can lead to the new paint peeling prematurely, undoing all the effort.
Gathering Supplies: Assemble all the necessary tools and materials before starting the repair. This will streamline the process and prevent unnecessary interruptions. Key supplies include:
- Scraper or putty knife
- Sandpaper (various grits)
- Sanding block or pole sander
- Cleaning solution (mild detergent and water)
- Sponge or cloth
- Painter's tape
- Drop cloths or plastic sheeting
- Joint compound (for patching holes)
- Primer (moisture-resistant)
- Paint (moisture-resistant, specifically for bathrooms)
- Paintbrush and roller
- Safety glasses and dust mask
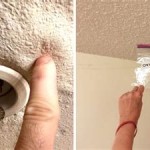
Removing Loose Paint: Begin by carefully removing all loose and peeling paint from the ceiling. Use a scraper or putty knife to gently lift and detach the paint. Be thorough and patient, as any remaining loose paint will compromise the adhesion of the new paint. A heat gun can sometimes be used to soften stubborn paint, but caution is necessary to avoid damaging the underlying surface.
Sanding the Surface: Once all the loose paint has been removed, sand the entire ceiling to create a smooth and even surface. Start with a coarser grit sandpaper to remove any remaining paint edges and imperfections, then gradually move to finer grits to achieve a smooth finish. A sanding block or pole sander can be helpful for reaching high areas. Wear a dust mask to protect yourself from inhaling dust particles.
Cleaning the Ceiling: After sanding, thoroughly clean the ceiling to remove any dust, debris, or mildew. Use a mild detergent and water solution, along with a sponge or cloth, to gently scrub the surface. Pay particular attention to areas where mildew is present. Rinse the ceiling with clean water and allow it to dry completely before proceeding.
Repairing Any Damage: Examine the ceiling for any holes, cracks, or other damage. If necessary, apply joint compound to fill these imperfections. Allow the joint compound to dry completely, then sand it smooth to blend with the surrounding surface. Multiple thin coats of joint compound are usually better than one thick coat to prevent cracking. Consider using a moisture-resistant joint compound, especially if the damage was caused by water leaks.
Taping and Protecting Surfaces: Use painter's tape to protect adjacent walls, moldings, and fixtures. Cover the floor with drop cloths or plastic sheeting to prevent paint splatters.
Applying Primer and Paint
With the ceiling properly prepared, the next step is to apply primer and paint. Selecting the right products and using proper application techniques are crucial for achieving a professional-looking and durable finish.
Applying Primer: Apply a coat of moisture-resistant primer to the entire ceiling. Primer helps to seal the surface, provide a better bond for the paint, and prevent moisture from penetrating the ceiling material. Use a high-quality primer specifically formulated for bathrooms. Apply the primer evenly, using a brush for edges and corners and a roller for larger areas. Allow the primer to dry completely according to the manufacturer's instructions before applying the paint.
Selecting Paint: Choose a high-quality, moisture-resistant paint specifically designed for bathrooms. These paints typically contain mildewcides to prevent mold growth and are formulated to withstand high humidity levels. Consider using a satin or semi-gloss finish, as these finishes are more durable and easier to clean than matte finishes. Avoid using flat paints in bathrooms, as they are more porous and susceptible to moisture damage.
Painting the Ceiling: Apply the paint in thin, even coats, using a brush for edges and corners and a roller for larger areas. Avoid applying too much paint in one coat, as this can lead to drips and runs. Allow each coat to dry completely before applying the next. Two coats of paint are typically sufficient for achieving full coverage and a durable finish.
Maintaining Proper Ventilation: During and after painting, ensure that the bathroom is well-ventilated. Open windows and doors, and use the exhaust fan to help remove moisture and speed up the drying process. Avoid using the shower or bath until the paint is completely dry and cured according to the manufacturer's instructions.
Clean Up: After painting, carefully remove the painter's tape and drop cloths. Clean up any paint splatters or spills immediately. Dispose of used paint cans and brushes properly. Inspect the ceiling for any imperfections and touch up as needed.
By diligently following these steps, anyone can successfully repair a peeling bathroom ceiling, preventing further damage and enhancing the overall appearance of the bathroom. Addressing the underlying cause of the peeling paint is equally important to prevent future occurrences. Regular cleaning, proper ventilation, and preventative maintenance will ensure that the bathroom ceiling remains in good condition for years to come.

How To Repair A Peeling Bathroom Wall Or Ceiling Melanie Lissack Interiors

How To Fix Peeling Paint On A Ceiling Step By Guide

How To Fix Peeling Ceiling Paint Diy Youtube

How To Fix Peeling Paint On A Ceiling Step By Guide

How To Fix Peeling Paint On A Ceiling Step By Guide

How To Fix Flaking Peeling Bubbled Paint Bathroom Ceiling Diy

Repairing Peeling Paint In A Bathroom Youtube

How Do I Fix Peeling Paint On Ceiling Home Painters Toronto

How To Ceiling Paint Peeling Off Plaster And It

What Causes Bathroom Ceiling Paint Peeling How To Fix It