How To Effectively Clean Your Ceiling
The ceiling, often overlooked in regular cleaning routines, accumulates dust, cobwebs, and even grease over time. Neglecting this area can impact indoor air quality and diminish the overall appearance of a room. This article provides a comprehensive guide to effectively cleaning ceilings, addressing various ceiling types and common cleaning challenges.
Before commencing any cleaning process, preparation is crucial. This involves gathering the necessary tools and materials, as well as taking precautions to protect furniture and oneself. A well-prepared approach minimizes disruption and ensures a thorough and safe cleaning experience.
Essential Tools and Materials
The specific tools and materials needed will vary depending on the type of ceiling being cleaned and the nature of the grime. However, some essentials remain constant. A sturdy ladder is paramount for safe access to the ceiling. Ensure the ladder is appropriate for the height and is placed on a level surface. A vacuum cleaner with a hose attachment and brush head is essential for removing loose dust and cobwebs. Microfiber cloths, known for their exceptional dust-trapping capabilities, are also indispensable. A long-handled duster, ideally with a pivoting head, will extend reach and facilitate cleaning in corners and along edges.
For more stubborn stains or grease, a mild cleaning solution is required. This can be a mixture of dish soap and water, or a specialized ceiling cleaner formulated for the specific ceiling material. A bucket is needed to hold the cleaning solution, and a sponge or mop (depending on the ceiling type) will be used to apply the solution. Safety goggles and gloves are necessary to protect eyes and skin from cleaning solutions. Finally, drop cloths or plastic sheeting should be laid down to protect flooring and furniture from drips and debris.
Pre-Cleaning Preparations
Prior to commencing the actual cleaning, removing or covering furniture is vital. Move furniture away from the walls and towards the center of the room. This creates ample space to maneuver the ladder and prevents damage from falling dust or cleaning solutions. Cover remaining furniture with drop cloths or plastic sheeting. This protective layer shields surfaces from potential stains and makes post-cleaning cleanup significantly easier. Remove any hanging light fixtures or décor attached to the ceiling. If removing fixtures is not possible, carefully cover them with plastic bags or drop cloths to protect them from cleaning solutions.
Thoroughly dust the entire room before tackling the ceiling. This step prevents dust from resettling on the freshly cleaned ceiling surface. Vacuum the floor and wipe down any exposed surfaces. Finally, open windows to provide ventilation during the cleaning process. This helps to dissipate odors from cleaning solutions and promotes faster drying.
Testing the cleaning solution in an inconspicuous area is always recommended. Choose a hidden corner of the ceiling to apply a small amount of the solution. This allows verification that the solution does not discolor or damage the ceiling material. Observe the test area for several minutes to ensure compatibility before proceeding with cleaning the entire ceiling.
Cleaning Different Types of Ceilings
The cleaning method must be tailored to the specific type of ceiling. Different materials require different approaches to avoid damage or discoloration. Common ceiling types include painted drywall, textured ceilings (popcorn ceilings), acoustic tiles, and wood ceilings.
Painted Drywall Ceilings: Painted drywall ceilings are generally the easiest to clean. Begin by dry-dusting the ceiling with a vacuum cleaner attachment or a long-handled duster. Pay particular attention to corners and edges where dust and cobwebs tend to accumulate. For light stains or smudges, a damp microfiber cloth can be used. Gently wipe the affected area, using a circular motion. Avoid applying excessive pressure or saturating the drywall. For more stubborn stains, a mild cleaning solution of dish soap and water can be used. Dip a clean sponge into the solution, wring out any excess liquid, and gently wipe the stained area. Wipe the area again with a clean, damp cloth to remove any soap residue. Ensure the ceiling is completely dry after cleaning to prevent mold growth.
Textured Ceilings (Popcorn Ceilings): Textured ceilings, often referred to as popcorn ceilings, are notoriously difficult to clean due to their porous and delicate surface. Avoid aggressive scrubbing or excessive moisture, as this can damage the texture and cause it to flake off. The best approach is to dry-dust the ceiling using a vacuum cleaner with a soft brush attachment. Hold the brush slightly above the ceiling surface to avoid direct contact. For light stains, a dry sponge can be used to gently dab the affected area. Avoid using water or cleaning solutions unless absolutely necessary. If water is required, use a spray bottle to lightly mist the stained area. Immediately blot the area with a clean, dry cloth. Consider hiring a professional cleaning service experienced in cleaning popcorn ceilings for heavily stained or damaged areas.
Acoustic Tile Ceilings: Acoustic tile ceilings are commonly found in offices and commercial spaces. These tiles are typically made of mineral fiber or fiberglass and can be easily damaged by excessive moisture. Similar to textured ceilings, dry-dusting is the preferred cleaning method. Use a vacuum cleaner with a soft brush attachment to gently remove dust and cobwebs. For light stains, a dry sponge can be used to dab the affected area. Avoid using water or cleaning solutions unless specifically recommended by the tile manufacturer. If water is used, ensure it is applied sparingly and the tiles are allowed to dry completely. Consider replacing individual stained or damaged tiles instead of attempting to clean them extensively.
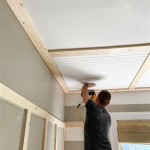
Wood Ceilings: Wood ceilings can add warmth and character to a room but require special care when cleaning. Dust the ceiling regularly with a microfiber cloth or a long-handled duster. For light stains or smudges, a damp cloth can be used, but avoid saturating the wood. Wood cleaner specifically designed for the finish of the wood ceiling can be used for more stubborn stains. Follow the manufacturer's instructions carefully. Always test the cleaner in an inconspicuous area first to ensure it does not damage the finish. After cleaning, apply a wood polish or sealant to protect the wood and enhance its natural beauty.
Dealing with Specific Ceiling Stains
Beyond general dust and cobwebs, ceilings often accumulate specific types of stains, such as grease, mold, and water stains. Addressing these stains requires targeted cleaning methods and appropriate cleaning solutions.
Grease Stains: Grease stains are common in kitchens and can be difficult to remove. A degreasing cleaning solution is the best option for tackling grease stains. Mix a small amount of dish soap or a specialized degreaser with warm water. Apply the solution to the stained area using a sponge or microfiber cloth. Gently scrub the area in a circular motion. Wipe the area with a clean, damp cloth to remove any soap residue. For stubborn grease stains, a paste of baking soda and water can be applied to the affected area. Allow the paste to sit for several minutes before wiping it away with a damp cloth.
Mold Stains: Mold stains indicate the presence of moisture and should be addressed promptly to prevent further growth and potential health problems. A solution of bleach and water is effective for killing mold and removing stains. Mix one part bleach with ten parts water. Apply the solution to the stained area using a spray bottle or sponge. Allow the solution to sit for several minutes before wiping it away with a clean, damp cloth. Ensure the area is well-ventilated during and after cleaning. Address the source of the moisture to prevent future mold growth. If the mold infestation is extensive, consider hiring a professional mold remediation service.
Water Stains: Water stains are usually caused by leaks from the roof or plumbing. The source of the leak must be repaired before attempting to clean the stain. Once the leak is fixed, allow the ceiling to dry completely. For light water stains, a primer and paint specifically designed to cover stains can be applied. For more severe water stains, it may be necessary to replace the damaged drywall. Cut out the damaged section of drywall and replace it with a new piece. Tape and mud the seams, and then prime and paint the area to match the existing ceiling.
Proper ventilation is crucial when dealing with any type of stain, especially when using cleaning solutions. Open windows and doors to allow fresh air to circulate. Wear gloves and safety goggles to protect skin and eyes from harsh chemicals. Never mix different cleaning solutions, as this can create dangerous fumes.
Maintaining a Clean Ceiling
Regular maintenance is key to preventing the buildup of dust and grime on the ceiling. Incorporate ceiling cleaning into the regular cleaning routine. Dust the ceiling with a long-handled duster or vacuum cleaner attachment at least once a month. This will prevent dust and cobwebs from accumulating and make more thorough cleaning less frequent.
Address spills and stains promptly. The sooner a spill or stain is addressed, the easier it will be to remove. Wipe up spills immediately with a clean cloth. For stains, use the appropriate cleaning solution for the specific type of stain. Avoid allowing stains to set, as this can make them more difficult to remove.
Improve ventilation in rooms prone to moisture. Kitchens and bathrooms are particularly susceptible to moisture buildup, which can lead to mold growth. Ensure adequate ventilation in these rooms by using exhaust fans or opening windows after showering or cooking.
Consider applying a stain-resistant paint to the ceiling. Stain-resistant paints are designed to repel stains and make them easier to clean. This can be particularly helpful in kitchens and bathrooms, where ceilings are more likely to get stained.
By following these guidelines, maintaining a clean ceiling becomes a manageable task, contributing to a healthier and more aesthetically pleasing living environment.

How To Clean A Ceiling Step By Guide

House Cleaning In Culver City Safe Ways To Clean High Ceilings

How To Safely Clean Very Mouldy Household Ceilings And Prevent Further Contamination Express Co

How To Clean Your Walls And Ceilings Bond Cleaning In Melbourne

How To Clean A Popcorn Ceiling Pro Housekeepers

How To Clean High Ceilings That Are Ly Impossible Reach Hometalk

How To Clean Popcorn Ceilings Easy Steps For A Fresh Look

How To Clean Ceilings With Smooth Or Textured Finishes

How To Clean Ceilings With Smooth Or Textured Finishes

How Often Do You Need To Clean Your Ceiling Bsolute Cleaning Part Time Maid Spring Carpet Services