An Easy Approach to Painting Ceilings
Painting ceilings can be a daunting task, often perceived as messy, physically demanding, and requiring specialized skills. However, with proper preparation, the right tools, and a systematic approach, painting ceilings can be a manageable DIY project. This article outlines a straightforward method for achieving a professional-looking finish, minimizing mess and maximizing efficiency.
Before commencing the painting process, meticulous preparation is paramount. Neglecting this step can lead to uneven paint application, unsightly drips, and a generally unsatisfactory outcome. Preparation involves clearing the room, protecting surfaces, and addressing any existing imperfections on the ceiling.
Begin by removing all furniture from the room. If moving furniture is not feasible, cover it completely with plastic sheeting. This prevents paint splatters and drips from damaging valuable belongings. Next, protect the flooring with drop cloths. Canvas drop cloths are preferable to plastic, as they are more durable, absorbent, and less prone to tearing. Secure the drop cloths in place with painter's tape to prevent them from shifting during the painting process.
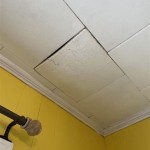
Carefully inspect the ceiling for any imperfections, such as cracks, holes, or stains. Repair any cracks or holes with spackle or joint compound. Allow the spackle to dry completely according to the manufacturer's instructions. Sand the repaired areas smooth with fine-grit sandpaper. Wipe away any sanding dust with a damp cloth before proceeding.
Addressing stains is crucial to ensure a uniform finish. Water stains, smoke stains, or grease stains can bleed through the new paint, resulting in discoloration. Apply a stain-blocking primer to any stained areas. Allow the primer to dry completely before painting. Consider applying primer to the entire ceiling if the existing paint is in poor condition or if changing from a dark to a light color.
Finally, thoroughly clean the ceiling to remove any dust, dirt, or cobwebs. Use a vacuum cleaner with a brush attachment or a damp cloth to wipe down the entire surface. A clean surface ensures proper paint adhesion and a smooth finish.
Key Point 1: Essential Tools and Materials for Ceiling Painting
Selecting the appropriate tools and materials is essential for a successful ceiling painting project. Using high-quality tools can significantly improve the ease of application and the overall finish. The following is a list of essential items:
Paint: Choose a high-quality paint specifically formulated for ceilings. These paints typically have a matte or flat finish to minimize glare and hide imperfections. Consider using a paint that is also mold and mildew resistant, especially in bathrooms or kitchens. Calculate the square footage of the ceiling and purchase an adequate amount of paint, accounting for two coats if necessary.
Primer: As mentioned earlier, primer is crucial for stain blocking and improving paint adhesion. Choose a stain-blocking primer if dealing with stains. A general-purpose primer can be used for other applications.
Paint Roller: A 9-inch roller with an extension handle is ideal for painting ceilings. The extension handle allows you to reach the ceiling without having to constantly climb up and down a ladder. Use a roller cover with a nap appropriate for the ceiling texture. A smooth roller cover is suitable for smooth ceilings, while a thicker nap roller cover is better for textured ceilings.
Roller Frame: Invest in a sturdy roller frame that securely holds the roller cover. A high-quality roller frame will prevent the roller cover from slipping or coming loose during painting.
Paint Tray: A paint tray with a disposable liner is essential for holding the paint and allowing you to load the roller evenly. The liner makes cleanup easier.
Paint Tray Liner: These liners are made of plastic and fit inside the paint tray. Disposing of the liner after use eliminates the need to clean the paint tray thoroughly.
Paint Brush: A 2-inch angled brush is ideal for cutting in around the edges of the ceiling, where the roller cannot reach. Cutting in involves painting a narrow strip of paint along the perimeter of the ceiling, creating a clean line.
Extension Pole: As mentioned previously, an extension pole is crucial for reaching the ceiling without excessive bending and stretching. Choose a pole that is adjustable in length for maximum versatility.
Ladder: A sturdy ladder is necessary for reaching higher sections of the ceiling and for cutting in around the edges. Ensure the ladder is placed on a stable surface and is positioned safely before climbing.
Painter's Tape: Painter's tape is used to mask off areas that you do not want to paint, such as walls, trim, and light fixtures. Choose a high-quality painter's tape that provides a clean release and prevents paint bleed-through.
Drop Cloths: As mentioned previously, drop cloths are essential for protecting the flooring from paint splatters and drips. Use canvas drop cloths for optimal durability and absorbency.
Spackle or Joint Compound: For repairing cracks or holes in the ceiling, spackle or joint compound is necessary. Choose a product that is easy to sand and dries quickly.
Sanding Block or Sandpaper: For smoothing out repaired areas, a sanding block or sandpaper is needed. Use fine-grit sandpaper to avoid damaging the surrounding surface.
Putty Knife: A putty knife is used to apply spackle or joint compound to cracks and holes.
Stir Sticks: Stir sticks are used to thoroughly mix the paint before application. Proper mixing ensures a consistent color and texture.
Rags: Rags are essential for wiping up spills, cleaning brushes, and removing excess paint.
Safety Glasses: Safety glasses protect your eyes from paint splatters and fumes.
Respirator or Mask: A respirator or mask is recommended to protect your lungs from paint fumes and dust particles.
Key Point 2: Efficient Painting Techniques for Ceilings
Employing efficient painting techniques can significantly speed up the process and improve the quality of the finished result. The following techniques are recommended:
Cutting In: Begin by cutting in around the perimeter of the ceiling with a 2-inch angled brush. Apply a smooth, even coat of paint along the edges, overlapping slightly onto the walls. This creates a clean line and provides a base for the roller. Work in manageable sections, completing one wall at a time.
Rolling: Once the cutting in is complete, begin rolling the paint onto the ceiling. Load the roller evenly with paint, avoiding overloading it. Start in one corner of the room and work in a consistent pattern, overlapping each stroke slightly. Apply the paint in a "W" or "M" pattern to ensure even coverage. Maintain a wet edge to prevent lap marks. Work in sections, completing one section at a time before moving on to the next.
Overlapping: Overlapping each stroke slightly is crucial for achieving a uniform finish. This prevents gaps and ensures that the paint is applied evenly across the ceiling.
Maintaining a Wet Edge: Maintaining a wet edge means always painting into a wet area of paint. This prevents lap marks and ensures a seamless transition between sections.
Applying a Second Coat: After the first coat of paint has dried completely, inspect the ceiling for any imperfections or areas with thin coverage. Apply a second coat of paint using the same techniques as the first coat. The second coat will provide a richer, more even finish.
Avoiding Drips: To prevent drips, avoid overloading the roller with paint. If drips occur, immediately wipe them away with a damp cloth. Also, ensure that the roller cover is securely attached to the roller frame.
Working in Sections: Working in sections allows you to maintain a wet edge and prevents the paint from drying out before you can blend it together. Complete one section at a time before moving on to the next.
Proper Ladder Placement: Ensure the ladder is placed on a stable and level surface. Avoid overreaching while on the ladder. Instead, reposition the ladder as needed to reach all areas of the ceiling safely.
Adequate Lighting: Ensure adequate lighting in the room to clearly see the areas you are painting. This will help you to identify any imperfections and ensure even coverage.
Key Point 3: Post-Painting Cleanup and Maintenance
Proper cleanup and maintenance are essential for preserving the longevity and appearance of the newly painted ceiling. Neglecting these steps can lead to premature deterioration and the need for more frequent repainting.
Removing Painter's Tape: Carefully remove the painter's tape while the paint is still slightly wet. This will prevent the paint from peeling off with the tape. If the paint has already dried, score the edge of the tape with a utility knife to prevent chipping.
Cleaning Brushes and Rollers: Clean brushes and rollers immediately after use to prevent the paint from drying and hardening. Rinse brushes and rollers thoroughly with water until all traces of paint are removed. Use a brush comb to remove any remaining paint particles. Store brushes and rollers properly to maintain their shape and condition.
Disposing of Paint: Dispose of leftover paint properly according to local regulations. Do not pour paint down the drain or into the sewer system. Allow the paint to dry completely in the can before disposing of it. Consider donating leftover paint to a local charity or community organization.
Cleaning Drop Cloths: Clean canvas drop cloths by shaking them out to remove any loose paint chips. Wash the drop cloths in a washing machine with a mild detergent. Hang the drop cloths to dry completely before storing them.
Inspecting the Ceiling: After the paint has dried completely, inspect the ceiling for any imperfections or areas that need touch-up. Touch up any areas with thin coverage or drips using a small brush.
Ventilating the Room: Ventilate the room thoroughly to allow the paint fumes to dissipate. Open windows and doors and use fans to circulate the air.
Regular Cleaning: Clean the ceiling regularly to remove dust and cobwebs. Use a vacuum cleaner with a brush attachment or a damp cloth to wipe down the surface. Avoid using harsh chemicals or abrasive cleaners, as these can damage the paint.
Addressing Moisture: Address any sources of moisture or humidity in the room to prevent mold and mildew growth on the ceiling. Repair any leaks in the roof or plumbing. Ensure proper ventilation in bathrooms and kitchens.
By following these easy steps and techniques, painting ceilings can be a straightforward and rewarding DIY project. With proper preparation, the right tools, and a systematic approach, achieving a professional-looking finish is within reach.

How To Paint A Ceiling Tips For Beginners The Diy Lighthouse

How To Best Paint Ceilings Valspar

How To Paint A Ceiling Tips Do It The Fastest Easiest Way Eco Friendly Home Garden Creative Green Living

How To Paint A Ceiling The Home

How To Paint A Ceiling

The Easiest Way To Paint Ceilings

How To Paint A Ceiling The Home

How To Paint A Ceiling Diy Like Pro

Pro Tips To Cut In Ceiling Paint Easily Youtube

How To Paint A Ceiling Tips Do It The Fastest Easiest Way Eco Friendly Home Garden Creative Green Living
Related Posts