Adding a Ceiling Fan to a Room: A Comprehensive Guide
Ceiling fans offer a multitude of benefits, contributing to both comfort and energy efficiency within a living space. From circulating air during warmer months to assisting in heat distribution during cooler periods, a ceiling fan represents a valuable addition to almost any room. Selecting the right fan, preparing the electrical wiring, and ensuring proper installation are all critical steps in successfully integrating this fixture into a home. This article provides a detailed guide to adding a ceiling fan to a room, covering aspects ranging from initial planning to final testing.
Before embarking on the installation process, a thorough assessment of the room is crucial. Consider the room's size, ceiling height, and existing electrical setup. These factors will directly influence the type of fan best suited for the space and the necessary preparations for safe and effective installation. Ignoring these preliminary considerations can lead to choosing an inappropriately sized fan or encountering unexpected electrical challenges.
Determining the Appropriate Fan Size and Type
The size of the room is directly correlated to the recommended blade span of the ceiling fan. A room smaller than 75 square feet typically benefits from a fan with a blade span of 36 inches or less. Rooms between 75 and 144 square feet generally require a fan with a blade span of 42 inches. Larger rooms, ranging from 144 to 225 square feet, necessitate a fan with a 52-inch blade span. For rooms exceeding 225 square feet, consider a fan with a blade span of 56 inches or larger, or potentially multiple fans to ensure adequate airflow.
Ceiling height also plays a significant role in fan selection. Ideally, the fan blades should be positioned between 7 and 9 feet from the floor. For rooms with standard 8-foot ceilings, a flush-mount or “hugger” fan is often the best choice, minimizing the distance between the ceiling and the fan blades. In rooms with higher ceilings, a downrod can be used to lower the fan to the optimal height. The length of the downrod will vary depending on the ceiling height, ensuring the blades are within the recommended range.
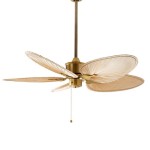
Beyond size considerations, the aesthetic of the fan should complement the room's existing décor. Ceiling fans are available in a wide array of styles, from traditional to contemporary. Consider the finish of the fan, the design of the blades, and the presence of any integrated lighting fixtures. Choosing a fan that aligns with the overall aesthetic of the room will enhance its visual appeal.
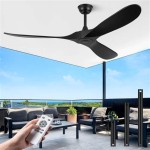
Furthermore, the type of location will influence the type of fan. Damp-rated fans, for example, are suitable for covered patios or sunrooms that may be exposed to moisture. Wet-rated fans are designed for direct exposure to rain and are appropriate for uncovered outdoor spaces. Installing a fan that isn't properly rated for its environment can lead to premature failure and potential safety hazards.
Preparing the Electrical Wiring and Support
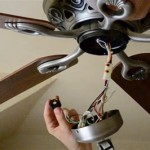
Before installing a ceiling fan, it is essential to verify the existing electrical wiring. Most ceiling fans require a dedicated ceiling fan-rated electrical box, which is designed to support the weight and vibration of the fan. Standard light fixture electrical boxes are typically not strong enough and can pose a safety risk. The electrical box should be securely attached to a ceiling joist and rated to support a minimum of 50 pounds.
If a standard light fixture box is currently installed, it must be replaced with a ceiling fan-rated box. This process involves turning off the power at the circuit breaker, removing the existing light fixture, and carefully detaching the old electrical box. A new ceiling fan-rated box is then installed, ensuring it is securely fastened to the joist. The electrical wiring is then reconnected, following proper wiring procedures, which typically involve connecting the black (hot) wire, the white (neutral) wire, and the green or bare copper (ground) wire.
If no electrical wiring is present in the intended location, a new circuit must be run from the circuit breaker to the ceiling. This is a more complex task that typically requires the expertise of a qualified electrician. Running a new circuit involves adding a new circuit breaker to the electrical panel, routing wiring through the walls and ceiling, and connecting the wiring to the ceiling fan-rated electrical box. Incorrect wiring can lead to electrical hazards, including fire.
Once the electrical box is properly installed and wired, it is important to test the circuit to ensure it is functioning correctly. This can be done using a voltage tester to verify that the correct voltage is present and that the circuit is properly grounded. Never proceed with the fan installation until the electrical wiring has been thoroughly inspected and verified.
Installing the Ceiling Fan
With the electrical wiring and support structure in place, the actual installation of the ceiling fan can begin. Most ceiling fans come with detailed instructions, which should be carefully followed. The installation process typically involves assembling the fan, mounting the mounting bracket to the electrical box, and connecting the electrical wiring.
Before beginning, turn off the power at the circuit breaker. Assemble the fan according to the manufacturer's instructions. This usually involves attaching the blades to the motor housing and connecting any integrated lighting fixtures. Ensure all screws and bolts are securely tightened to prevent vibration and noise during operation.
Next, mount the mounting bracket to the ceiling fan-rated electrical box. The bracket should be securely attached with screws, ensuring it is level and stable. Once the bracket is in place, carefully lift the fan motor housing into the bracket, following the manufacturer's instructions. This may involve maneuvering the fan into a specific position and securing it with screws or bolts.
The next step is connecting the electrical wiring. Typically, the fan will have color-coded wires that correspond to the wires in the electrical box. Connect the black wire from the fan to the black wire in the box, the white wire to the white wire, and the green or bare copper wire to the green or bare copper wire. Use wire connectors to securely join the wires, ensuring no bare wire is exposed. Tuck the wires carefully into the electrical box.
Once the wiring is complete, attach the fan canopy to the mounting bracket, concealing the electrical box and wiring. The canopy is typically secured with screws or bolts. Finally, attach the fan blades to the motor housing, ensuring they are properly aligned and securely fastened. Double-check all connections and ensure all screws are tightened.
After the installation is complete, restore the power at the circuit breaker and test the fan. Verify that the fan operates at all speed settings and that any integrated lighting fixtures are functioning correctly. If the fan wobbles excessively, consult the manufacturer's instructions for balancing the blades. Balancing kits are often included with the fan and can be used to correct any imbalance.
Properly securing the fan blades is essential for safe and quiet operation. The screws holding the blades should be tightened regularly as they may loosen over time due to vibration. A loose blade can cause the fan to wobble and potentially detach, posing a safety hazard.
Adding a ceiling fan to a room requires careful planning, preparation, and execution. By understanding the factors influencing fan selection, properly preparing the electrical wiring, and following the manufacturer's instructions, homeowners can enhance their living space with the comfort and energy efficiency that a ceiling fan provides. Consulting with a qualified electrician is recommended for individuals who are uncomfortable working with electrical wiring or who encounter unexpected challenges during the installation process.

Wiring Adding Recessed Lighting To Room With Ceiling Fan Light Already Installed Home Improvement Stack Exchange

Where To Put A Ceiling Fan Best Position Of In The Room Youtube

How To Install Ceiling Fan In Any Room Diy Youtube

How To Install An Electric Ceiling Fan In Singapore

Reasons To Install Ceiling Fan In Your Hdb

How To Install An Electric Ceiling Fan In Singapore

How To Install A Ceiling Fan Like Professional Expert

Add A Fan To Any Room Without Existing Fixture Or Wiring Youtube

How To Install An Electric Ceiling Fan In Singapore

25 Living Room Ceiling Fan Ideas To Elevate Your Space