Adding a Ceiling Fan to a Room: A Comprehensive Guide
Installing a ceiling fan can significantly improve comfort and energy efficiency within a room. A ceiling fan circulates air, providing a cooling effect in warmer months and helping to distribute heat during cooler periods. This article provides a comprehensive guide to adding a ceiling fan to a room, covering aspects such as preparation, safety considerations, installation steps, and troubleshooting common issues.
Planning and Preparation
Before commencing the installation, a thorough assessment of the room and careful planning are necessary. Key considerations include the room size, ceiling height, existing electrical wiring, and selection of an appropriate ceiling fan model.
Room Size: A larger room typically requires a fan with a larger blade span to effectively circulate air. Smaller rooms can adequately be served by smaller fan models. Blade span refers to the diameter of the circle the fan blades create when rotating. Guidelines generally suggest using a blade span of 50-54 inches for rooms up to 400 square feet, 42-48 inches for rooms between 225-400 square feet, and 36-42 inches for rooms smaller than 225 square feet. However, these are general guidelines, and personal preferences should also be considered.
Ceiling Height: Adequate ceiling height is crucial for fan safety and performance. Building codes typically require at least seven feet of clearance between the floor and the bottom of the fan blades. For ceilings lower than eight feet, a flush-mount fan, also known as a hugger fan, is recommended. Flush-mount fans are designed to sit close to the ceiling, minimizing the distance between the blades and the floor. For higher ceilings, a downrod can be used to lower the fan to an optimal height of eight to nine feet above the floor.
Existing Electrical Wiring: It is imperative to verify that the existing electrical wiring is suitable for supporting a ceiling fan. A standard light fixture circuit may not be adequate, particularly if the fan includes a light kit. Consult a qualified electrician to assess the wiring and make necessary upgrades if needed. This may involve installing heavier gauge wiring, a dedicated circuit breaker, or a fan-rated electrical box. A fan-rated electrical box is designed to support the weight and vibration of a ceiling fan, ensuring safe and reliable operation.
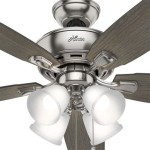
Fan Selection: A wide variety of ceiling fans are available, differing in size, style, features, and price. When choosing a fan, consider the room's décor, desired features such as remote control or integrated lighting, and energy efficiency ratings. Energy Star certified fans are designed to use less energy and can contribute to lower utility bills.
Before starting the installation process, gather all necessary tools and materials. This typically includes a screwdriver set (Phillips and flathead), wire strippers, wire connectors, electrical tape, a ladder, a voltage tester, a drill (if needed), a measuring tape, and safety glasses. Ensure the ceiling fan is complete with all its components, including the motor housing, blades, mounting bracket, downrod (if applicable), and hardware.
Safety Precautions
Safety is paramount when working with electrical wiring. Prior to commencing any work, turn off the power to the circuit at the breaker box. Verify the power is off using a voltage tester before touching any wires. Never work on electrical wiring while standing in water or on a wet surface.
Disconnect Power: Locate the circuit breaker that controls the existing light fixture or electrical box in the room. Switch the breaker to the "off" position. To ensure the power is completely off, it's advisable to double-check with a non-contact voltage tester. Place the voltage tester near the wires to confirm the absence of electrical current.
Inspect Wiring: Before disconnecting any wires, carefully examine their condition. Look for signs of damage, such as frayed insulation or corrosion. If any damage is present, consult an electrician to address the issue before proceeding. It is also recommended to take a photograph of the existing wiring configuration before disconnecting anything. This will serve as a valuable reference during the re-wiring process.
Use Appropriate Safety Gear: Wear safety glasses to protect eyes from falling debris or dust. Use a sturdy ladder that is appropriate for the ceiling height. Ensure the ladder is placed on a stable and level surface. If working with exposed wires, consider wearing insulated gloves for additional protection.
Weight Considerations: Be aware of the weight of the ceiling fan. If the existing electrical box is not fan-rated, it will need to be replaced with one that can safely support the weight of the fan. Attempting to hang a ceiling fan from an inadequate electrical box could result in the fan falling, causing injury or damage.
Installation Procedure
The installation process involves several steps, including removing the old fixture, installing the mounting bracket, wiring the fan, and attaching the blades. Follow the manufacturer's instructions closely, as specific procedures may vary depending on the fan model.
Remove the Existing Fixture: Carefully remove the existing light fixture. Disconnect the wires, taking note of their connections. Typically, there will be a black (hot) wire, a white (neutral) wire, and a green or bare copper (ground) wire. Use wire connectors to cap the wires after disconnecting them from the fixture to prevent accidental contact.
Install the Mounting Bracket: If the existing electrical box is fan-rated and compatible with the fan's mounting bracket, it can be used. If not, replace it with a fan-rated electrical box. Securely attach the mounting bracket to the electrical box according to the manufacturer's instructions, ensuring it is properly aligned and secured.
Wire the Fan: Connect the fan's wires to the corresponding wires in the electrical box. Typically, the black wire from the fan connects to the black wire in the electrical box, the white wire from the fan connects to the white wire in the electrical box, and the green or bare copper wire from the fan connects to the green or bare copper wire in the electrical box. Use wire connectors to secure the connections and wrap them with electrical tape for added insulation. Ensure that all wire connections are tight and secure. Loose connections can cause overheating and potential fire hazards.
Assemble the Fan: Assemble the fan according to the manufacturer's instructions. This typically involves attaching the downrod to the motor housing, threading the wires through the downrod, and then attaching the motor housing to the mounting bracket. Carefully follow the instructions to ensure all components are properly aligned and secured. When lifting the motor housing, it is helpful to have a second person assist to avoid strain or damage.
Attach the Blades: Attach the fan blades to the motor housing using the provided screws. Ensure the blades are properly aligned and securely fastened. Loose blades can cause the fan to wobble or vibrate excessively. Some fans may have decorative blade irons that also need to be attached.
Install the Light Kit (If Applicable): If the fan includes a light kit, install it according to the manufacturer's instructions. Connect the light kit wires to the corresponding wires in the motor housing. Be careful not to pinch or damage any wires during installation.
Test the Fan: After completing the installation, restore power to the circuit at the breaker box. Test the fan to ensure it is functioning properly. Verify that the fan blades rotate smoothly and quietly and that the light kit (if applicable) is working correctly. Test all fan speeds and light settings to ensure they are operating as expected.
Troubleshooting Common Issues
Even with careful installation, some issues may arise. Addressing these issues promptly can prevent more significant problems.
Fan Wobble: Fan wobble is a common issue that can be caused by unbalanced blades. To correct this, first, ensure that all blade screws are tightened. If the wobble persists, use the balancing kit that is typically included with the fan. Follow the instructions in the kit to identify the blade causing the wobble and attach the balancing weights accordingly.
Noisy Operation: Fan noise can be caused by loose screws, unbalanced blades, or issues with the motor. Tighten all screws and ensure the blades are properly balanced. If the noise persists, lubricate the motor according to the manufacturer's instructions. If the noise is excessive or unusual, consult a qualified electrician.
Light Malfunction: If the light kit is not working, check the light bulbs to ensure they are not burned out. If the bulbs are good, check the wiring connections to the light kit. Ensure that all connections are secure and that the wires are not damaged. If the light kit still does not work, consult a qualified electrician.
Remote Control Issues: If the fan is operated by a remote control and the remote is not working, first, check the batteries. Replace the batteries with fresh ones if necessary. If the remote still does not work, ensure that the remote is properly paired with the fan receiver. Consult the manufacturer's instructions for the pairing procedure.
Fan Not Starting: If the fan is not turning on at all, ensure that the power to the circuit is turned on at the breaker box. Check the wiring connections to the fan to ensure they are secure. If the fan still does not start, consult a qualified electrician.

Wiring Adding Recessed Lighting To Room With Ceiling Fan Light Already Installed Home Improvement Stack Exchange

Adding A Ceiling Fan To Room Tuckers Gets Facelift

Wiring A Ceiling Fan Step By Installation Guide Wave Electrical Solutions

How To Add A Ceiling Light Room With No Existing Wiring

25 Living Room Ceiling Fan Ideas To Elevate Your Space

Wiring A Ceiling Fan And Light With Diagrams Ptr

How To Replace A Ceiling Light With Fan Diy Installation

Clever Ways To Add Light A Room Without Wiring

Add A Ceiling Fan To Your Covered Patio Neighbourly Expert Tips

Ceiling Fans New Styles For Welcoming Spaces
Related Posts